Would you like to accept Google Pay on your WordPress site?
When you allow your customers to choose their preferred payment method, you’ll build trust and increase conversions on your website.
In this article, we’ll show you how to accept Google Pay in WordPress.
Why Accept Google Pay in WordPress?
If you’re selling products or services on your WordPress website or asking for donations, then it’s important to let your visitors pay using their preferred method.
Often they will want to pay by credit card or PayPal, but newer methods like Google Pay and Apple Pay are becoming more popular.
Google Pay is available in 40 countries around the world and makes online payments simple. However, your customers can only use it if they’re on an Android device running version Lollipop 5.0 or higher, so you’ll probably want to include additional payment options for people using other devices.
That being said, let’s take a look at how to accept Google Pay in your online store.
Note: We’ll cover how to add a Google Pay option in WordPress without adding a full eCommerce cart, but we will leave other helpful resources at the end of this article for those looking for full eCommerce solutions.
How to Accept Google Pay in WordPress
The first thing you need to do is install and activate the WP Simple Pay plugin. For more details, see our step by step guide on how to install a WordPress plugin.
WP Simple Pay is a simple yet powerful WordPress invoicing and payments plugin. The best part is that WP Simple Pay does not charge you any additional transaction fees, and you can set it up without the complexity of a cart system.
It lets you add Apple Pay, Google Pay, credit card as well as ACH bank payments, so you can give users multiple payment options which improves conversion.
While there is a free version of the plugin, you need the Pro plugin to accept Google Pay, create on-site payment forms, and more.
Upon activation, the WP Simple Pay setup wizard will start automatically. You simply need to click the ‘Let’s Get Started’ button to continue.

On the first page, you’ll be asked to enter your license key. You can find this information from your account on the WP Simple Pay website.
After that, you need to click the ‘Activate and Continue’ button to move to the next step.

On the second page, you will need to connect WP Simple Pay to Stripe. Stripe is a popular payment gateway, and it’s the easiest way to add Google Pay to your website. It also supports all top credit and debit cards, Apple Pay, ACH payments, and more.
Simply click the ‘Connect with Stripe’ button, and from there you can log in to your Stripe account or create a new one. Anyone with a legitimate business can create a Stripe account and accept payments online.

Note: Stripe requires your site to be using SSL/HTTPS encryption. If you don’t already have an SSL certificate for your website, then please see our step by step guide on how to add SSL in WordPress.
Once you’ve connected to Stripe, you’ll be asked to configure your WP Simple Pay emails.
The options for payment and invoice emails to your customers have already been enabled for you. So is the option for sending payment notification emails.

You just need to enter the email address where the notifications should be sent.
Once you’ve done that, you need to click the ‘Save and Continue’ button to complete your setup of WP Simple Pay.

Google Pay is enabled by default when using Stripe Checkout, and will be automatically offered to Android users in participating countries.
If you decide to disable Google Pay in the future, then you will need to change the payment method settings in the Stripe Dashboard.
Creating a Payment Form in WordPress
Next, you need to create a payment form.
You can do that by clicking the ‘Create a Payment Form’ button on the last page of the setup wizard. This will automatically take you to the WP Simple Pay » Add New page.
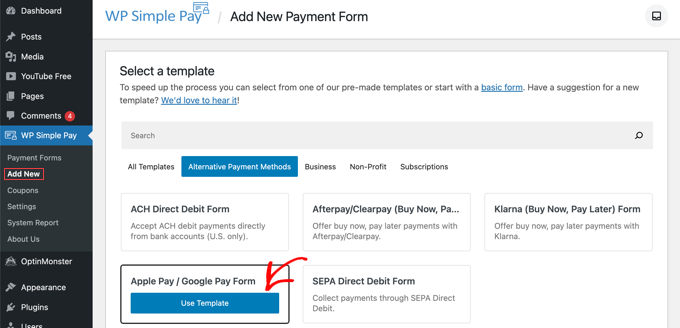
You’ll be shown a list of payment form templates. You need to scroll down until you locate the Apple Pay / Google Pay template.
Simply hover over the template and click the ‘Use Template’ button when it appears.
This will take you to the payment form editor.
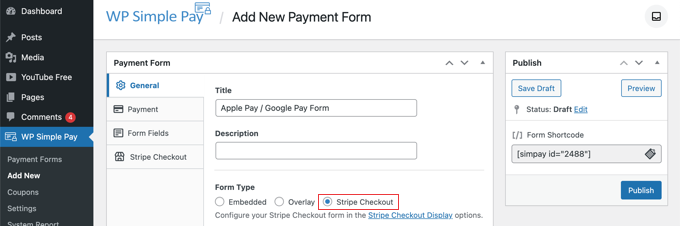
If you like, you can rename the form and give it a description. After that, you need to select the ‘Stripe Checkout’ option under Form Type.
After you’ve done that, we’ll move on to the Payment tab.
Here you can set the payment mode to either live or testing. Testing mode will let you make payments that are not actually charged so you can make sure your form is working properly and emails are being sent.
Don’t forget to change this to ‘Live’ when you’ve finished testing and are ready to start receiving payments from your customers.

You can also add the products or services that you offer, along with their prices and whether they are a one-time payment or a subscription.
Simply click the ‘Add Price’ button until you have added as many prices as you need. After that, you will need to add a label and price for each one. You can also select other options, such as recurring payments, or the user can determine the price, as in a donation.

You can show or hide a price by clicking the small arrow on the right.
Next, we’ll move on to the ‘Form Fields’ tab. Notice that the essential fields have already been added to the form, including an ‘Apple Pay / Google Pay’ button, credit card details, and a checkout button.

Using the ‘Form Fields’ drop down, you can choose additional fields and add them by clicking the ‘Add Field’ button. Options include name, phone number, address, and much more.
Finally, the ‘Stripe Checkout’ tab allows you to select additional payment methods and tweak the checkout form that is displayed after the user clicks the ‘Pay’ button.
For this tutorial, we’ll leave those settings as they are.

When you are happy with your payment form, click on the ‘Publish’ button to store your settings and push the form live.
Now we can add the form to a post or page on your website.
Adding the Payment Form to Your Website
WP Simple Pay makes it super easy to add forms anywhere on your website.
Simply create a new post or page, or edit an existing one. Then, click on the plus (+) sign at the top and add a WP Simple Pay block in the WordPress block editor.
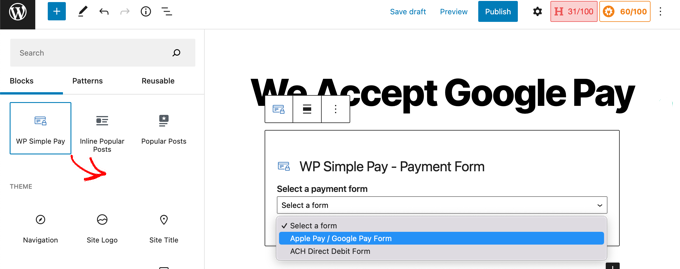
After that, select your order form from the dropdown menu in the WP Simple Pay block.
Once you’re finished, you can update or publish the post or page, and then click on the preview button to see your form in action.
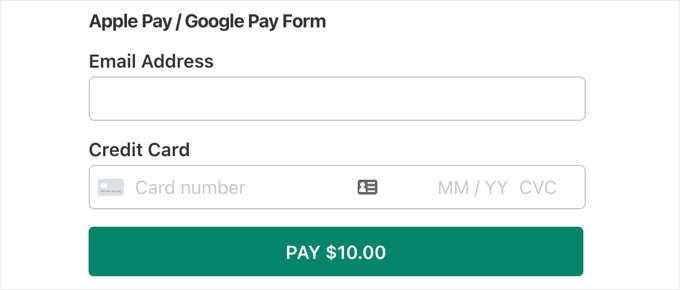
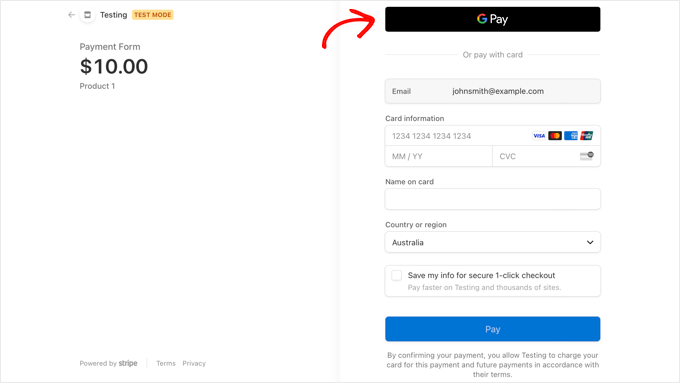
When your users click the Pay button, the Stripe checkout form will be displayed.
If they are using an Android device running Lollipop 5.0 or higher, then the Google Pay option will be displayed at the top of the form. Otherwise, the Google Pay option will be hidden, and your customers can pay using a credit card.
If you’re looking for other ways to add Google Pay in WordPress, then you can use full eCommerce solutions like Easy Digital Downloads or WooCommerce. Both of them have support for Apple Pay and Google Pay options.
We hope this tutorial helped you learn how to accept Google Pay in WordPress. You may also want to learn the right way to create an email newsletter, or check out our expert pick of the best contact form plugins for WordPress.
If you liked this article, then please subscribe to our YouTube Channel for WordPress video tutorials. You can also find us on Facebook and Facebook.
The post How to Accept Google Pay in WordPress (The Easy Way) first appeared on WPExperiencecoder.