Are you looking to create a vertical navigation menu in WordPress?
In WordPress, navigation menus can be displayed horizontally or vertically. Vertical menus offer a number of advantages, such as fitting your website’s sidebar better and being easier to navigate on mobile devices.
In this article, we’ll show you how to create a vertical navigation menu in WordPress.
What Is a Navigation Menu?
A navigation menu is a list of links pointing to important areas of a website. They are usually presented as a horizontal bar of links at the top of every page on a WordPress website.
Navigation menus give your site structure and help visitors find what they’re looking for. You can add links to your most important pages, categories or topics, WordPress blog posts, and even custom links such as your social media profile.
But while you often see them placed horizontally at the top of a website, vertical navigation menus have many uses and advantages.
With that being said, let’s take a look at a number of ways to create a vertical navigation menu in WordPress. Here are the topics we’ll cover in this article:
- Try Different Menu Display Locations
- Adding a Vertical Navigation Menu to the Sidebar
- Creating a Vertical Navigation Menu on a Post or Page
- Adding a Vertical Navigation Menu Using the Full Site Editor
- Creating a Vertical Navigation Menu using a Theme Builder Plugin
- Creating a Responsive Vertical Navigation Menu for Mobile Devices
- Creating a Drop Down Menu in WordPress
- Creating a Mega Menu in WordPress
Try Different Menu Display Locations
When you add a navigation menu to your website, it will be displayed either vertically or horizontally. This depends on your theme, as well as the menu location you select.
The number of menu locations that are available depends on the theme you are using. You may find that some of these locations display the menu vertically.
To test this with your theme, you need to navigate to Appearance » Menus. Here you can experiment to see which locations are available on your website and how they are displayed.
Note: If you see ‘Appearance » Editor (Beta)’ instead of ‘Appearance » Menus’, then your theme has Full Site Editing (FSE) enabled. You’ll need to refer to the Creating a Vertical Navigation Menu Using the Full Site Editor section below.
For example, the Twenty Twenty-One theme doesn’t offer any vertical locations, while the Twenty Twenty theme offers one, called ‘Desktop Expanded Menu’.
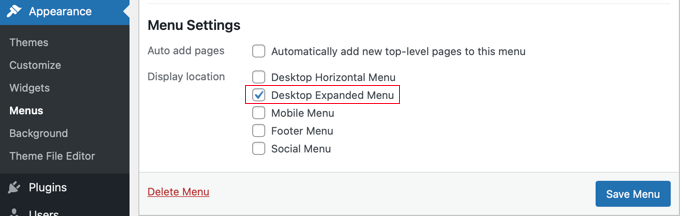
You can simply select the menu that you wish to display vertically, and then check the ‘Desktop Expanded Menu’ box at the bottom of the screen. After that, you must make sure to click the ‘Save Menu’ button to store your settings.
This is how it looks on our demo website.

For more information on editing menus and menu locations, you can see our beginner’s guide on how to add a navigation menu in WordPress.
Adding a Vertical Navigation Menu to the Sidebar
No matter what theme you’re using, it’s easy to add a vertical navigation menu to the sidebar using a widget.
First, you’ll need to create a navigation menu that you want to display, if you haven’t already.
Then you need to navigate to Appearance » Widgets. From here, simply click the blue ‘+’ block inserter button found at the top of the page, and drag the Navigation Menu block onto the sidebar.
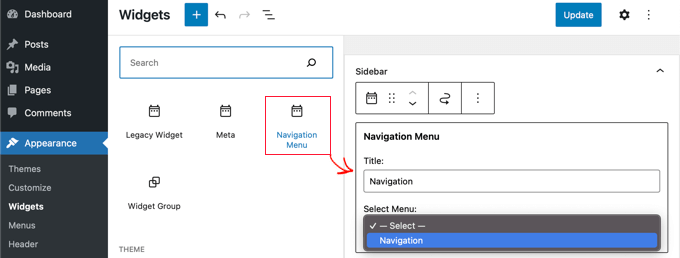
After that, you can give the widget a name and select the menu you wish to display from the drop down menu.
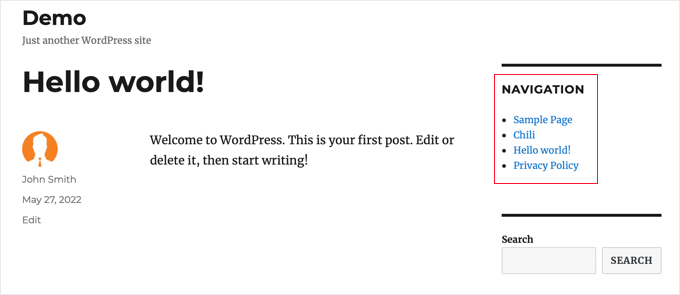
Here’s how the vertical sidebar menu looks on our demo website.
Creating a Vertical Navigation Menu on a Post or Page
You can add a vertical navigation menu to posts and pages in a similar way.
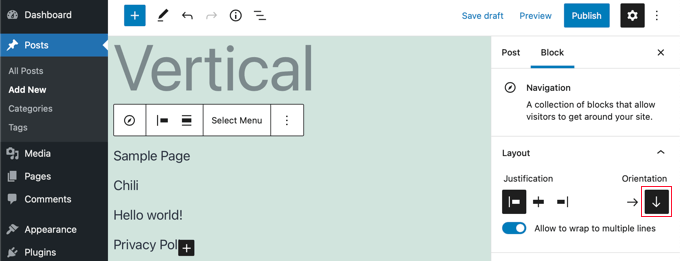
First, you need to create a new post or edit an existing one. After that, you need to click the blue ‘+’ block inserter button at the top of the page, and then drag the Navigation block onto the page.
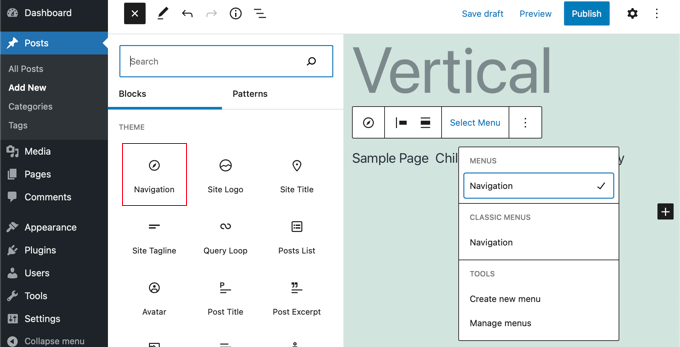
Next, you need to choose which menu will be displayed. Simply click the ‘Select Menu’ button on the toolbar and select the desired menu.
Finally, you need to look at the block’s settings in the left hand pane. There you will find two buttons for the menu’s orientation. You will need to click the down arrow button to orient the menu vertically.
Adding a Vertical Navigation Menu Using the Full Site Editor
The new full site editor allows you to customize your WordPress themes using the block editor. It was released in WordPress 5.9, and it enables you to add different blocks to your templates to create a unique design.
However, the full site editor is still in beta and limited to specific themes that support it, such as the default Twenty Twenty-Two theme. For more details, you can see our article on the best WordPress full site editing themes.
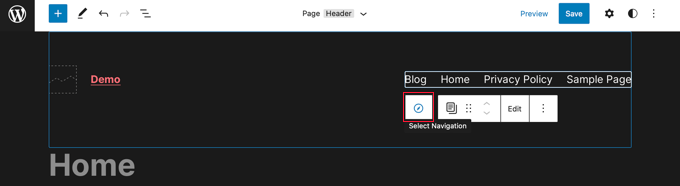
To add a navigational menu using the full site editor, you need to go to Appearance » Editor from your WordPress dashboard. Once you’re in the editor, go ahead and click on the navigational menu that appears at the top of the website header.
Next, you’ll need to click on the ‘Select Navigation’ button on the toolbar.
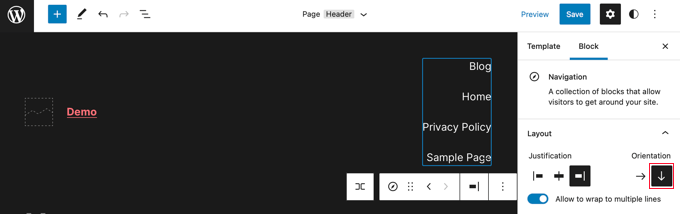
Now you’ll see different options to customize the navigational menu on the panel on the right. One of those options is whether to display the menu with a horizontal or vertical orientation.
Simply click the Down arrow for vertical orientation to create a vertical menu.
For more information, see our guide on how to add a navigation menu in WordPress
Creating a Vertical Navigation Menu using a Theme Builder Plugin
SeedProd is the best WordPress page builder and custom theme builder plugin on the market. It allows you to easily create vertical menus anywhere on your WordPress website.
The first thing you need to do is install and activate the SeedProd plugin. For more details, see our step by step guide on how to install a WordPress plugin.
Note: There is a free version of SeedProd that will allow you to add a vertical navigation menu to individual pages. But you will need the Pro version to access the theme builder and add a menu to your theme’s templates.
Upon activation, you need to enter your license key. You can find this information under your account on the SeedProd website.

After that, you need to use SeedProd to create a custom WordPress theme.
Creating a Custom WordPress Theme
You’ll find the SeedProd theme builder by navigating to the SeedProd » Theme Builder page. Here, you’ll use one of SeedProd’s ready-made themes as a starting point. This will replace your existing WordPress theme with a new, custom design.
You can do that by clicking the ‘Themes’ button.

You will be shown a list of professionally designed themes for different types of websites. For example, there are templates called ‘Modern Business’, ‘Marketing Agency’, and ‘Mortgage Broker Theme’.
Take a look through the options and select one that best matches your needs by clicking the checkmark icon.

Once you have chosen a theme, SeedProd will generate all the theme templates you need. You can learn how to customize these templates in our guide on how to easily create a custom WordPress theme.
Adding a Vertical Navigation Menu to Your Site’s Templates
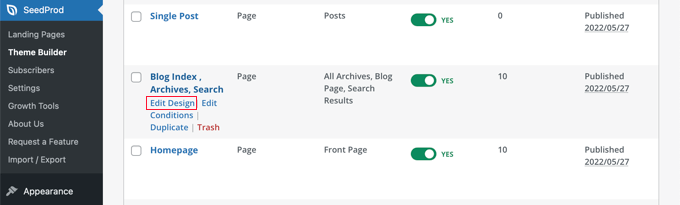
Now you can use SeedProd to add a vertical navigation menu to any of your theme templates. In this tutorial, we’ll add a menu to the blog index template.
You need to hover your mouse over that template, and then click the ‘Edit Design’ link.
This will open SeedProd’s drag and drop page builder. You’ll see a preview of your website on the right, and a collection of blocks you can add to your site on the left.
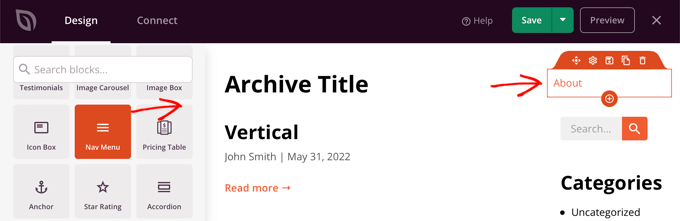
You need to scroll down the blocks until you come to the Advanced section.
Once you locate the Nav Menu block you should drag it onto your sidebar or anywhere that you want to display the navigation menu. By default, there is only one item in the menu, ‘About’.
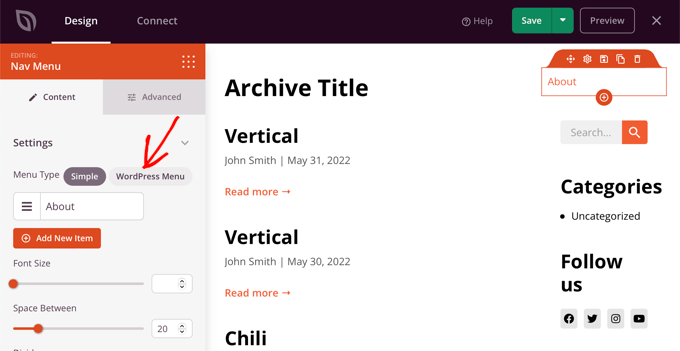
Now you will need to change the menu’s settings. To do that, you need to click on the menu and the available options will be displayed in a pane on the left of the page.
Currently, the ‘Simple’ menu type is selected. This allows you to build your own navigation menu in SeedProd.
However, for this tutorial, we’ll click the ‘WordPress Menu’ type to use the WordPress navigation menu instead.
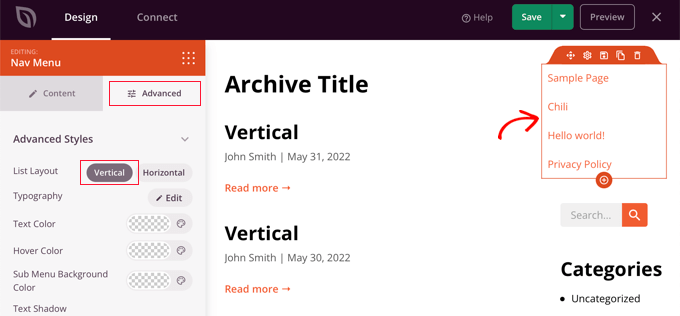
Finally, you need to click on the ‘Advanced’ tab. Here you’ll find an option to orient the list layout vertically or horizontally.
When you click on the ‘Vertical’ button you’ll notice the preview immediately change to a vertical navigation menu.
Don’t forget to click the ‘Save’ button at the top of the screen to store your vertical menu.
Creating a Responsive Vertical Navigation Menu for Mobile Devices
It can be difficult to tap on a standard menu while using the small screen of a smartphone. That’s why we recommend that you preview the mobile version of your WordPress site to see how your website looks on mobile devices.
Vertical menus are much easier to navigate, especially when you use a fullscreen responsive menu that will automatically adjust to different screen sizes.

To learn how to make your navigation menu easier to use on mobile devices, see our guide on how to add a fullscreen responsive menu in WordPress.
Creating a Drop Down Menu in WordPress
A dropdown menu looks like a normal horizontal navigation menu at the top of the screen, but when you hover your mouse over one of the items, a vertical submenu is displayed.
If you have a website with a lot of content, then a dropdown menu allows you to organize the menu structure by topics or hierarchy. This will show more content in a limited space.

To display a dropdown navigation menu on your website, you will need to choose a theme with dropdown menu support. After that, you need to create the navigation menu, and then add sub-items to some of the menu entries.
You can learn how to do that step by step in our beginner’s guide on how to create a dropdown menu in WordPress.
Creating a Mega Menu in WordPress
A mega menu lists multiple menus vertically across the page. They’re similar to dropdown menus, except all of the submenus are displayed at once, allowing users to quickly and easily find your very best content.
Mega menus are highly engaging and interactive because they combine the best of horizontal and vertical menus to show a helpful overview of your website’s contents on a single screen.
We recently added a mega menu to WPExperiencecoder to improve content discoverability. We explain how we did this in our behind the scenes look at our new site design.

You can learn more in our guide on how to add a mega menu to your WordPress site.
We hope this tutorial helped you learn how to create a vertical navigation menu in WordPress. You may also want to learn how to start your own podcast, or check out our expert comparison of the best domain registrars.
If you liked this article, then please subscribe to our YouTube Channel for WordPress video tutorials. You can also find us on Facebook and Facebook.
The post How to Create a Vertical Navigation Menu in WordPress first appeared on WPExperiencecoder.