Do you want to highlight text in a WordPress post or page?
Being able to highlight text can help you point user’s attention to a specific text area. This can be great to highlight a call to action, special offer, or simply add emphasis on specific sentences.
In this article, we’ll show you how to easily highlight text in WordPress both with or without a plugin.
Why and When to Highlight Text
Text highlighting is an easy way to emphasize important information in your content. This helps you direct user’s attention to important calls to action.
Here’s a sample of what text highlighting can look like:

By default, the WordPress content editor does not come with the option to simply select and highlight any text. You can still emphasize text by making it italic, change text color, or making it bold.
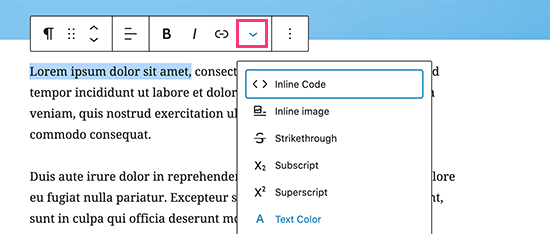
That being said, let’s take a look at how to easily highlight text in WordPress.
Method 1. Highlight any Text in WordPress (No HTML Required)
The easiest way to highlight text is by using a WordPress plugin.
First, you need to install and activate the Advanced Editor Tools plugin. For more details, see our step by step guide on how to install a WordPress plugin.
Advanced Editor Tools (formerly known as TinyMCE Advanced) adds more formatting options and extends the WordPress block editor.
Once the plugin is activated, you can edit the WordPress post or page where you want to highlight some text. Simply select the text you want to modify and then click on the dropdown arrow for more formatting options.
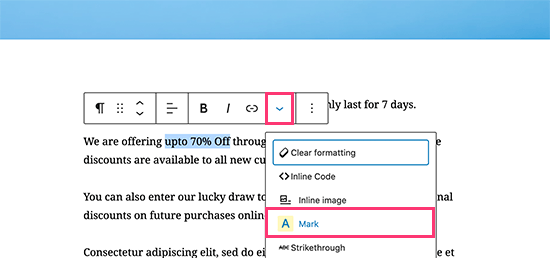
From the drop-down menu, you need to select the ‘Mark’ option. This will highlight the text using the default colors.
However, the actual color may vary depending on your WordPress theme colors. You can now save your post/page and preview it to see the highlighted text in action.

Easy wasn’t it?
However, if you don’t need to highlight text very often, then this next method allows you to do the same without using a plugin.
Method 2. Manually Highlight Text in WordPress
This option requires a little bit of code, but it’s easy to implement.
For this example, we’ll be using the HTML ‘mark’ element. This can be used to highlight and bring attention to a certain part of your writing.
Simply edit the post or page where you want to highlight the text. Next, go to the paragraph containing the text and then click on three-dot menu in the block toolbar. From here, you need to select ‘Edit as HTML’ option.
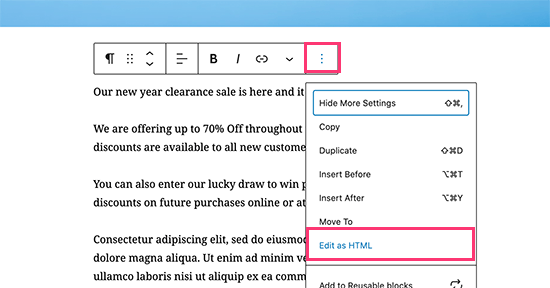
Next, you’ll see raw text in HTML format. Simply wrap the text you want to highlight inside the <mark> and </mark> tags like this:
<mark>highlighted text</mark>
You can now switch back to the visual mode by clicking on the three-dot menu again and selecting ‘Edit Visually’ in the block toolbar.
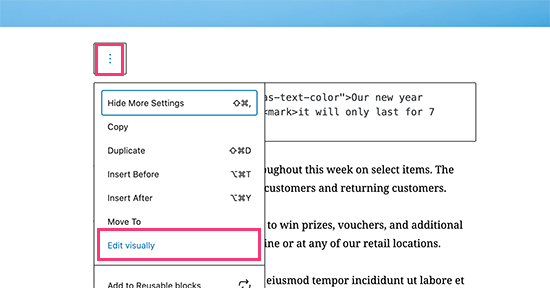
The block area will switch back to the visual mode, and you’ll notice your selected text highlighted.

Your highlighted text may look different depending on your WordPress theme. However, normally it is just a yellow background.
If you would like to change it, then you can do so by adding your own custom CSS.
Simply go to Appearance » Customize page to launch the theme customizer. From here, you need to switch to the ‘Additional CSS’ tab.
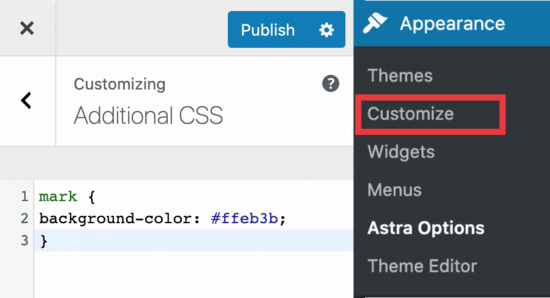
Here you can paste your custom CSS. You can use the following CSS code as a starting point.
mark {
background-color: #ffd4a1;
}
Once you’re done, hit the ‘Publish’ button to save your changes. You can now visit your WordPress blog to see your highlighted text in action.

We hope this helped you learn how to highlight text in WordPress. You may also want to see our guide on the best WordPress page builders to help you create completely custom designs without any code, and our comparison of the best email marketing services to grow your traffic.
If you liked this article, then please subscribe to our YouTube Channel for WordPress video tutorials. You can also find us on Twitter and Facebook.
The post How to Highlight Text in WordPress (Beginner’s Guide) appeared first on WPBeginner.