Do you want to limit authors to editing their own posts in WordPress?
If you run a multi-author site or allow guest posts, then it’s a good idea to restrict contributors to only see their own blog posts in the dashboard, and keep them from viewing the posts of other authors before they’re published.
In this article, we will show you how to limit authors to viewing and managing only their own posts in the WordPress dashboard.
Why Limit Authors to Their Own Posts?
By default, your WordPress website will show all posts and pages to all users, regardless of their user role in the admin area. Whether you’re an author, editor, contributor, or administrator, you can view all the articles.
This usually isn’t a problem if the authors are part of your company or team.
However, limiting people to view their own posts is useful in certain situations. For instance, if you run a multi-author website, then it can be useful to keep authors from seeing other writers’ articles in review.
That being said, let’s take a look at how you can limit authors to view their own posts in the WordPress admin.
Limit Authors to Their Own Posts Using a Plugin
Using a WordPress plugin, you can easily allow authors to see only their own posts without editing code.
For this tutorial, we will be using the PublishPress Permissions plugin. It’s a free plugin that lets you manage WordPress permissions, and works out of the box to limit writers to their own articles.
There is also a premium version available in PublishPress Pro bundle, which offers more permission settings like who can access the media library. However, you can start with the free version.
First, you’ll need to install and activate the PublishPress Permissions plugin. For more details, you can follow our guide on how to install a WordPress plugin.
Once the plugin is active, it will automatically show posts to only their authors.
For example, if you’re logged in as the administrator and head over to Posts » All Posts from your dashboard, then you’ll see all the posts.
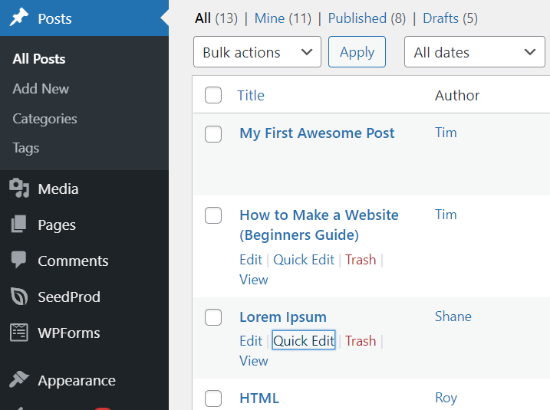
However, if you log in to the WordPress admin area from an author’s account, then you’ll notice that only the posts created by the author will be visible.
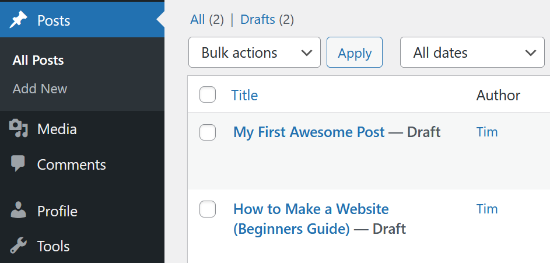
Now, what if you want your editors to be able to access all the posts so they can review them? Let’s see how you can do that.
How to Allow Editors to View All Posts
The problem with using the above method is that it only allows administrators to view all posts.
Many WordPress sites have editors responsible for proofreading articles submitted by other authors and guest contributors. Using this plugin will restrict editors to only their own posts.
However, you can allow editors to review different authors’ content by using a plugin like PublishPress Capabilities plugin or adding code to your site’s theme files. We’ll show you both the methods.
Using PublishPress Capabilities Plugin
PublishPress Capabilities is another plugin created by PublishPress. For the sake of this tutorial, we will be using the free version. There is also a pro version that you can get when you subscribe to a PublishPress Pro account.
First, you’ll need to install and activate the PublishPress Capabilities plugin on your WordPress website. You can follow our step-by-step guide on how to install a WordPress plugin.
After the plugin is active, go ahead and click on ‘Capabilities’ in your WordPress admin menu. This will open the ‘Role Capabilities’ page, where you can change permissions for different user roles.
Next, select the user role you want to edit from the dropdown menu in the top left corner.
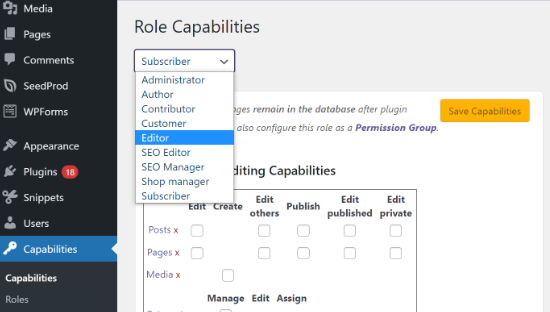
Once you’ve selected the ‘Editor’ role, you’ll need to make sure that the checkbox for ‘Edit others’ is enabled under the Editing Capabilities settings.
This will allow editors to edit other posts.
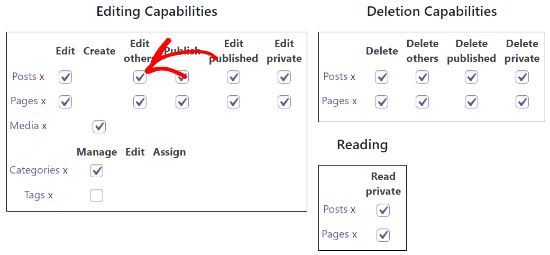
After that, scroll down to the Additional Capabilities section and ensure that the ‘list others posts’ checkbox is enabled.
This way, anyone with the editor role will be able to see posts from other authors.
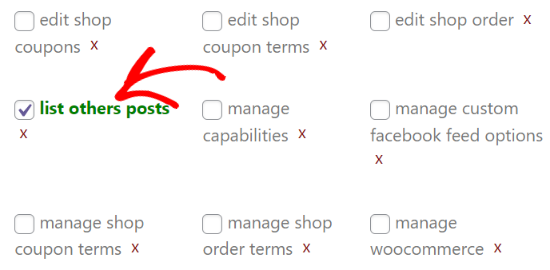
Now, save your settings and view the Posts section on your website by logging in as an editor. If you’re able to view and edit other authors’ posts, then it means you’ve correctly set up the settings.
Adding Custom Code to Your Theme
Another way to allow editors to view all posts is by adding custom code to your theme files. However, we don’t recommend this method for beginners as it involves editing code.
To start, you can add this code in your theme’s functions.php file or a site-specific plugin.
function posts_for_current_author($query) {
	global $pagenow;

	if( 'edit.php' != $pagenow || !$query->is_admin )
	    return $query;

	if( !current_user_can( 'edit_others_posts' ) ) {
		global $user_ID;
		$query->set('author', $user_ID );
	}
	return $query;
}
add_filter('pre_get_posts', 'posts_for_current_author');
This code allows any users with the capability to edit other’s posts to view all posts. This means editors and administrators will be able to see all posts. Users with other roles like contributors or authors will only see their own posts.
If you are using custom user roles on your site, then you need to keep in mind that users who can edit posts added by other users will also be able to see them listed in the dashboard.
Bonus: Limit Authors to View Specific Posts or Pages
You can also limit authors, editors, contributors, and other user roles to view, edit, and delete certain blog posts and pages.
Using the PublishPress Permissions plugin, you can easily decide which specific posts and pages people can view on your website dashboard.
To start, install and activate the PublishPress Permissions plugin on your website. You can refer to our tutorial on how to install a WordPress plugin.
Now, let’s say you want specific article to only be edited by the website’s editor and no one else.
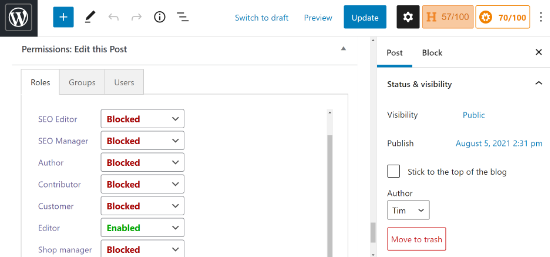
To do that, you can edit that post. Once you’re in the WordPress block editor, simply scroll down to the ‘Permissions: Edit this Post’ meta box.
Next, you’ll have to click on the dropdown menu for all other user roles and choose the ‘Blocked’ option. By default, the permission will be set to ‘default: Yes’, where everyone can edit the post.
After that, make sure that you leave the setting for the editor to the ‘Enabled’ or ‘default: Yes’ option. When you’ve set the permissions, make sure to update your blog post.
We hope this article helped you learn how to limit authors to their own posts in the WordPress admin area. You may also want to take a look at our tutorial on how to choose the best blogging platform, or our expert comparison of the best email marketing services.
If you liked this article, then please subscribe to our YouTube Channel for WordPress video tutorials. You can also find us on Facebook and Facebook.
The post How to Limit Authors to their Own Posts in WordPress Admin appeared first on WPExperiencecoder.