Do you want to accept recurring payments on your WordPress website?
Recurring billing lets you charge your customers at a set time interval such as weekly, monthly, quarterly, annually, or even at custom intervals.
In this article, we will show you how to easily accept recurring payments in WordPress using multiple methods.
Why Should You Accept Recurring Payments in WordPress?
There are many benefits to adding recurring billing on your WordPress website.
First, it helps automate the billing process and can save you time. With recurring payments, you don’t have to spend time manually sending invoices and waiting for payments from your customers.
Automatic recurring payments can also help you more easily make money from your WordPress website with fewer payment delays and errors.
Since you’re not bothering your customers with payment requests, automated billing can also improve their experience and help you retain your customers.
That being said, let’s take a look at how to accept recurring payments in WordPress. Simply use the quick links below to jump straight to the method you prefer.
- Method 1. Accept Recurring Payments Using WPForms Stripe Addon
- Method 2. Accept Recurring Payments Using MemberPress
- Method 3. Accept Recurring Payments Using WP Simple Pay
- Method 4. Accept Recurring Payments Using WooCommerce
Method 1. Accept Recurring Payments Using WPForms Stripe Addon
One way to accept recurring payments is by adding a form to your website. This method is recommended for beginners and small businesses, as it’s quick and easy to set up.
To create a recurring payment form, you’ll need a user friendly and flexible form builder plugin.
WPForms is the best WordPress form builder plugin on the market. It allows you to create any type of form for your site including forms that collect recurring payments.
First, you need to install and activate the WPForms plugin. For more details, you can follow our guide on how to install a WordPress plugin.
For this guide, we’ll be using WPForms Pro because it gives you access to the Stripe Payments addon. This addon makes it easy to collect recurring payments using Stripe.
Stripe is a popular payment processor that lets you accept credit card payments on your website without the hassle of setting up a separate merchant account.
If you don’t already have a Stripe account, don’t worry. WPForms will guide you through the process of creating an account, step by step.
After activating the WPForms plugin, go to WPForms » Settings and enter your WPForms license key.
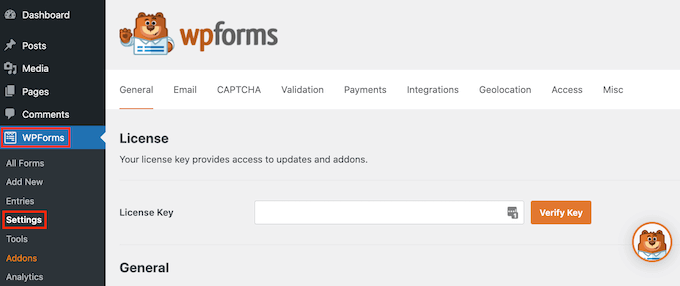
You can find this key by logging into your WPForms account.
After that, you’ll want to go to WPForms » Addons. This screen shows all the addons that you can install.
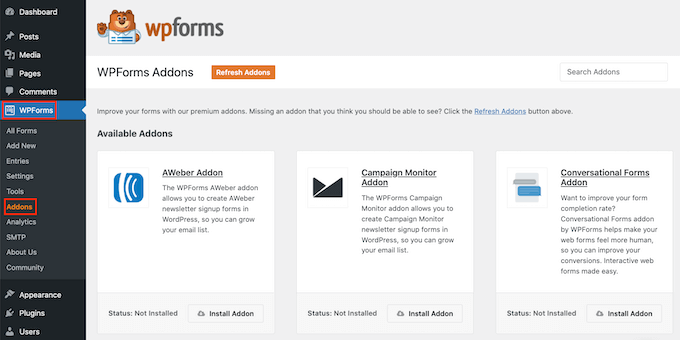
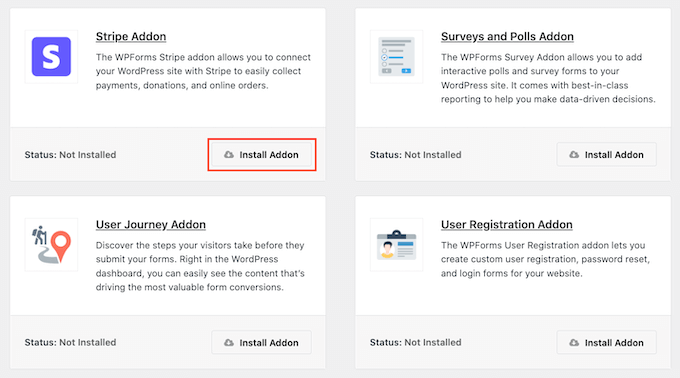
Simply scroll until you find the ‘Stripe Addon.’
Then, click on its ‘Install Addon’ button.
Once you’ve activated the Stripe addon, your next task is connecting Stripe to your WordPress website.
To do this, head over to WPForms » Settings » Payments.
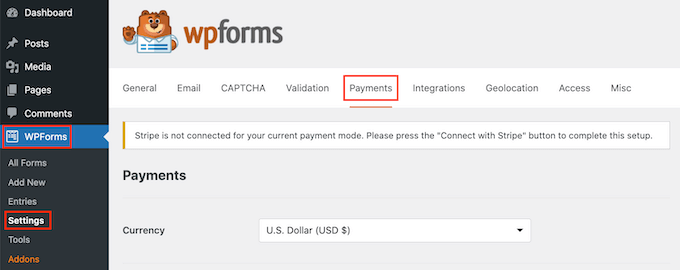
On this screen, find the ‘Connect with Stripe’ button and give it a click.
WPForms will now guide you through the process of signing into your Stripe account, or creating a new account.
Once you’ve done that, you will be redirected to the WPForms ‘Settings’ page.
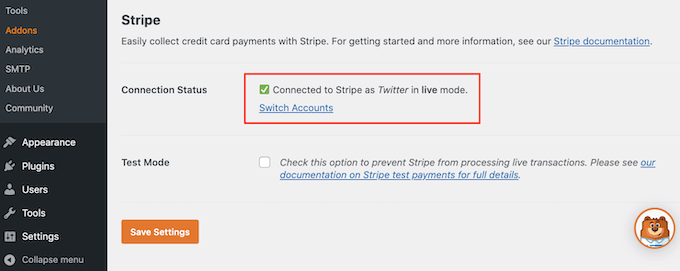
The ‘Connect Status’ should now have a green checkmark, to show that WPForms is connected to your Stripe account.
The next step is creating an online order form and enabling the Stripe recurring payment option. First we’re going to navigate to WPForms » Add New.
This will open the WPForms editor.
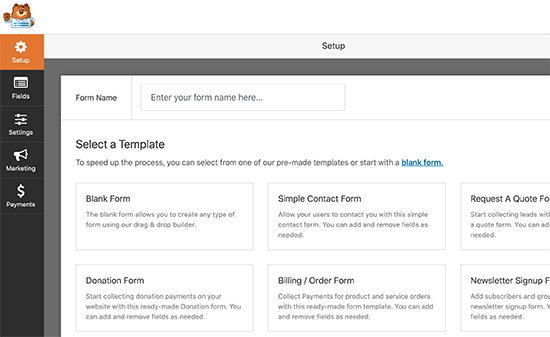
You can now type a name for your recurring payment form into the ‘Name Your Form’ field.
Your site visitors won’t see the name so it’s just for your reference.
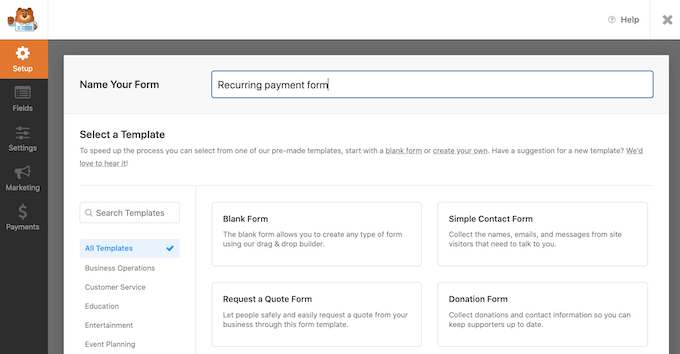
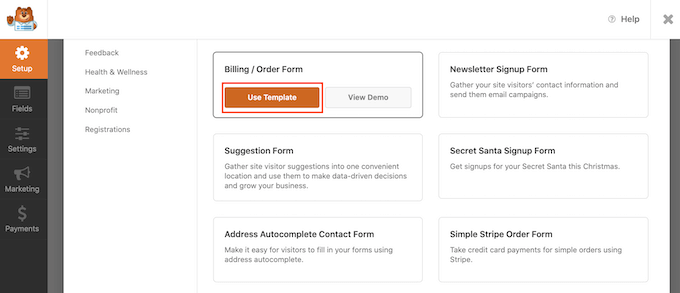
WordPress will now show all the ready-made WPForms templates that can help you get started. For this guide we’ll use the ‘Billing / Order Form’ template.
To choose this template, hover your mouse over it. Then, you just need to click on the ‘Use Template’ button.
WPForms will open this template in the form builder.
You can now customize all of this template’s fields according to your needs. To edit a field, simply give it a click.
The left-hand menu will then show all the settings for your chosen field.
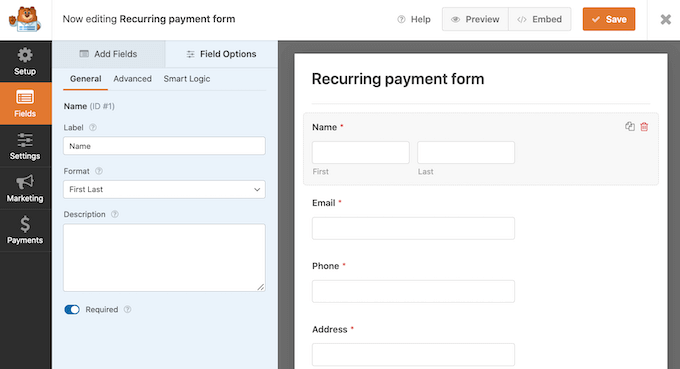
Once you’ve finished customizing these fields, you’ll need to add a Stripe Credit Card field to your form. This field allows you to collect recurring payments from your customers.
In the left-hand menu, select the ‘Add Fields’ tab.
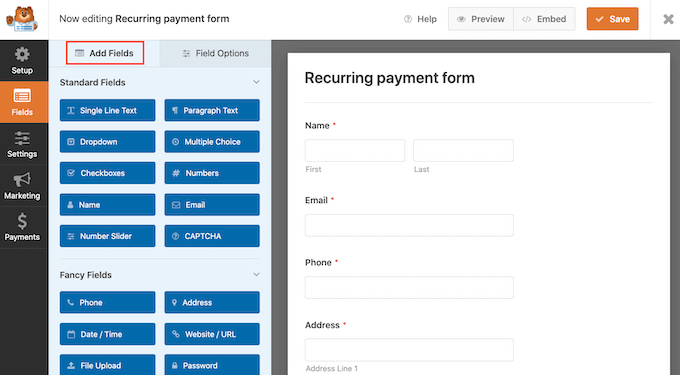
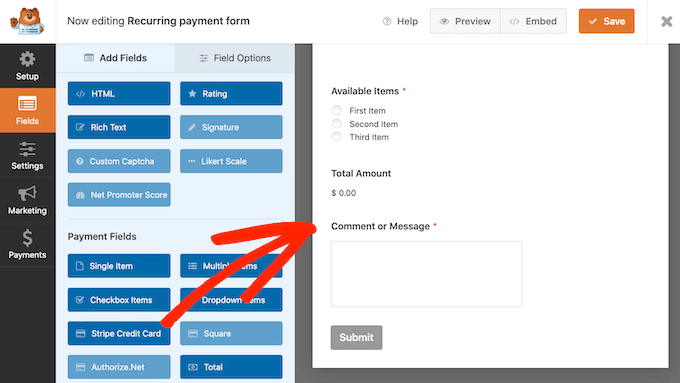
Then scroll to the ‘Payment Fields’ section.
After that we’re going to drag and drop the ‘Stripe Credit Card’ field onto your form.
Once you’re happy with how your form looks, it’s time to set up recurring payments by selecting the ‘Payments’ tab.
Then, just click on ‘Stripe.’
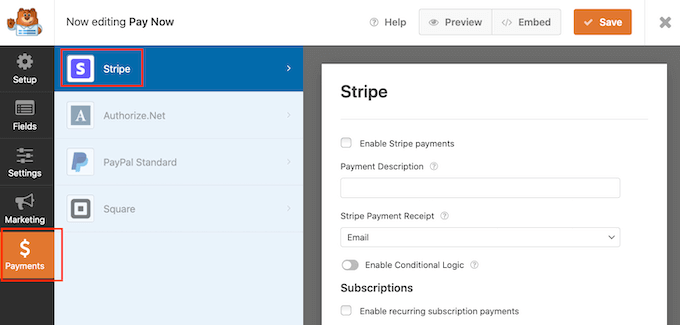
Next, check the box next to ‘Enable Stripe payments.’
Your form is set up to accept payments using Stripe.
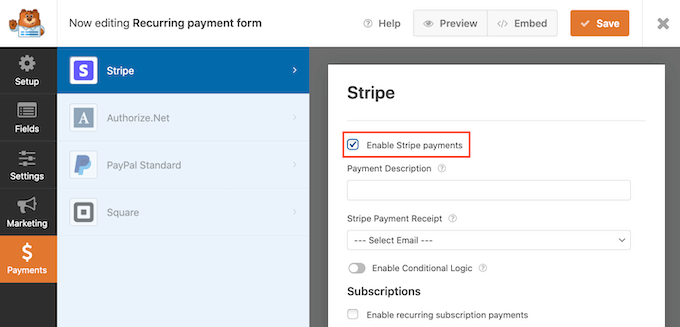
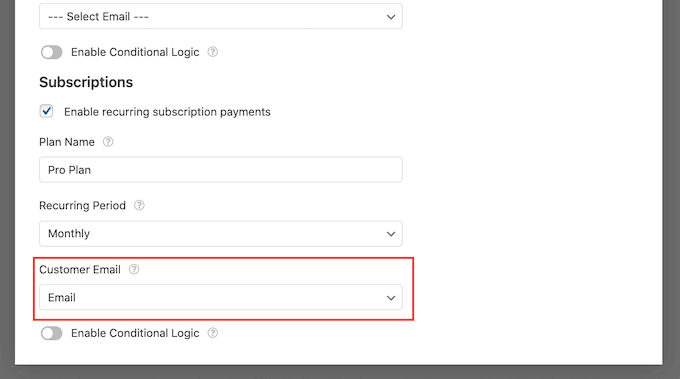
Once you’ve done that, scroll to the ‘Subscriptions’ section.
You can then check the box that says ‘Enable recurring subscription payments.’
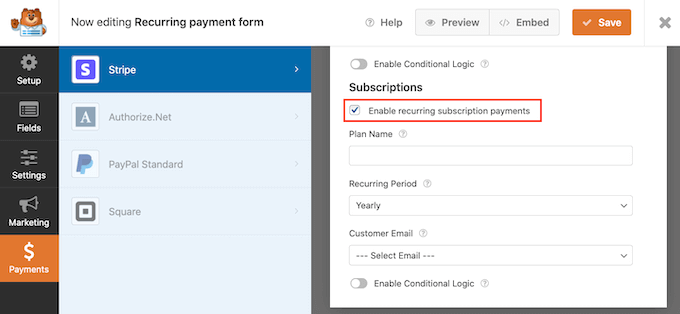
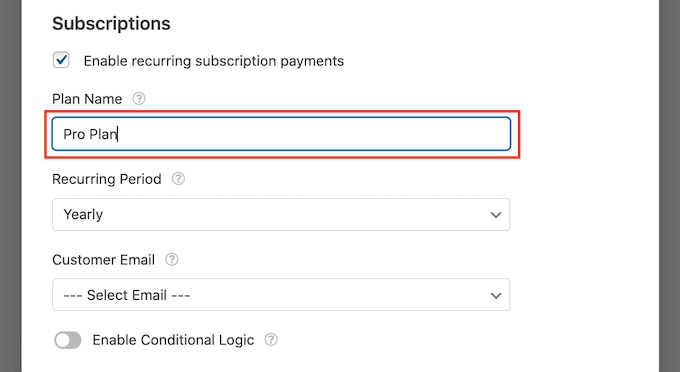
You can now create a plan name, which will appear in your Stripe transactions. This helps you see where each payment came from.
You can type this name into the ‘Plan Name’ field.
If you leave this field empty, then WPForms will use the form’s name as your plan name.
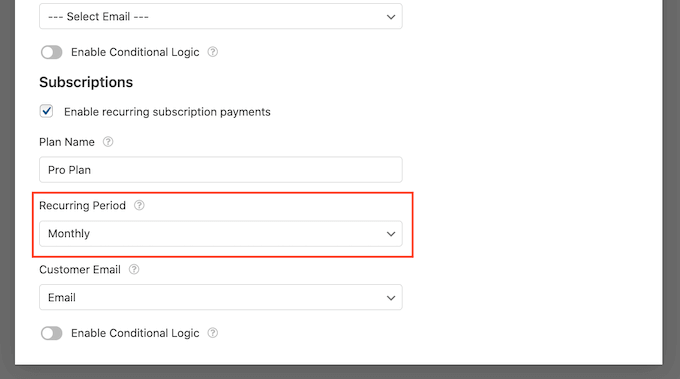
Next, choose how frequently you’ll charge your customers using the ‘Recurring Period’ dropdown menu.
You can select anything from daily recurring payments, right through to yearly payments.
If you want to sell recurring payments using Stripe, then you must provide Stripe with the customer’s email address. This gives Stripe a way to let customers know about any problems with their payment.
To give Stripe access to this information, simply open the ‘Customer Email’ dropdown and choose ‘Email.’
Next, you will need to enable AJAX form submissions. This allows your customers to submit the recurring payment form without having to reload the entire page. This will improve the customer experience.
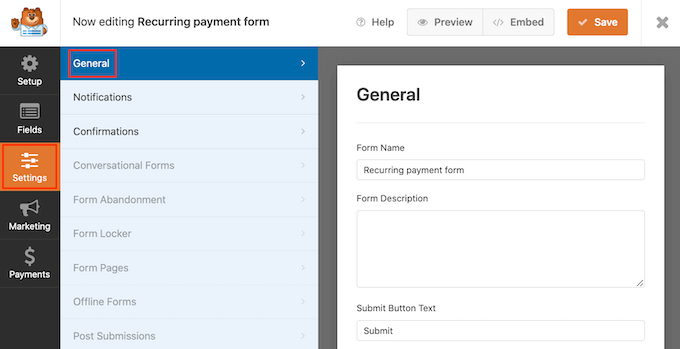
To enable AJAX form submissions, head over to Settings » General.
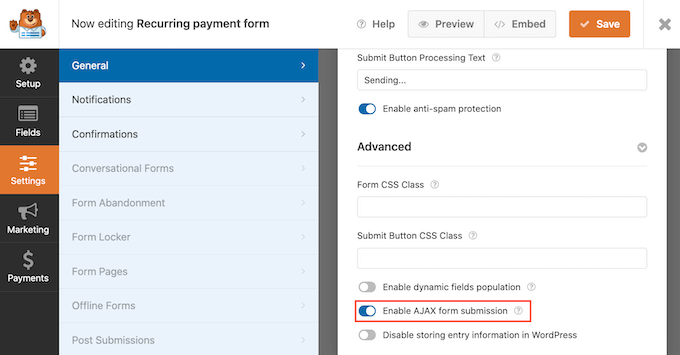
Here, you can click to expand the ‘Advanced’ section.
Now we’re ready to check the ‘Enable AJAX form submission’ box.
Once you’re done with that, click on the ‘Save’ button to save your form settings.
Add the Recurring Payment Form to Your Website
WPForms makes it easy to add forms anywhere on your website or WordPress blog.
To publish your recurring payment form, simply open up the page or post where you want to show this form.
On the WordPress content editor screen, click on the (+) to add a new block.
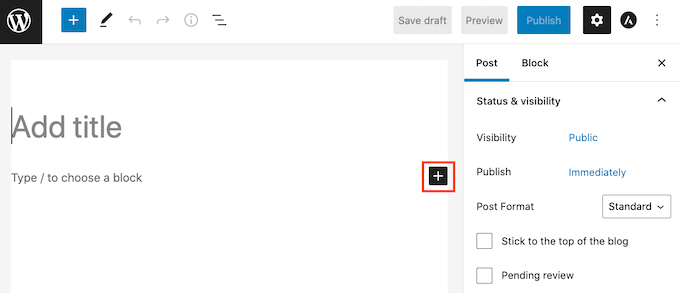
Then type ‘WPForms’ to find the right block.
Once you click on the WPForms block, WordPress will add this block to your page or post.
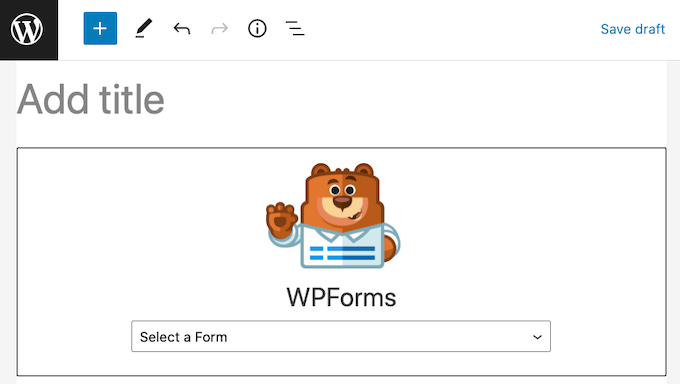
Next you need to open the dropdown menu and select the form you created earlier.
You will now see a preview of your form right inside the WordPress editor.
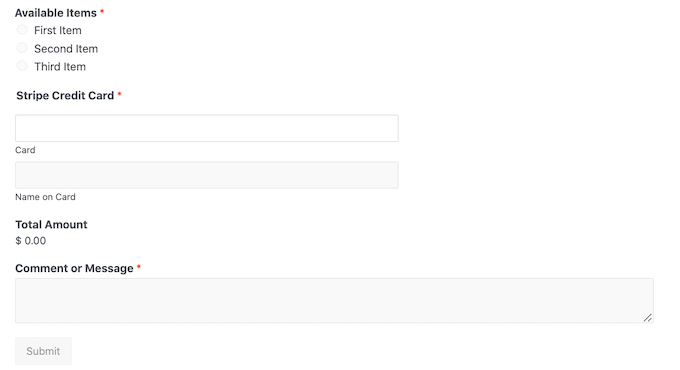
If you’re happy with how the form looks, then you can publish or update this page.
Now, you can visit your website to see your recurring payment form live.
After publishing any form, it’s a good idea to monitor its stats to find out what’s working and not working. For more details, please see our complete guide to WordPress conversion tracking made simple.
Method 2. Accept Recurring Payments Using MemberPress
Are you creating a membership site and want to set up recurring payments for your subscribers?
This is where MemberPress comes in.
MemberPress is the best WordPress membership plugin in the market. You can use this plugin to sell subscriptions, online courses, and group memberships for corporate teams.
MemberPress also allows you to create membership levels, collect payments, restrict access based on membership levels, and more.
First, you will have to create a membership website. You can follow our step by step guide on creating a WordPress membership site to get started.
Once you’ve created a membership site, you need a way to collect recurring payments.
To set up your payment options, go to MemberPress » Settings. Then, just click on the ‘Payment’ tab.
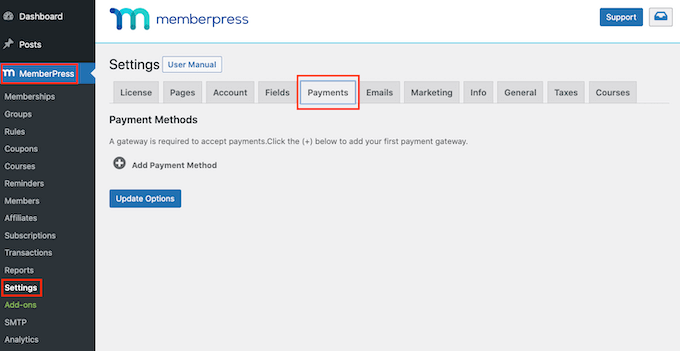
To set up recurring payments you’ll need to add at least one payment gateway.
To add a payment option, click on the ‘Add Payment Method’ button.
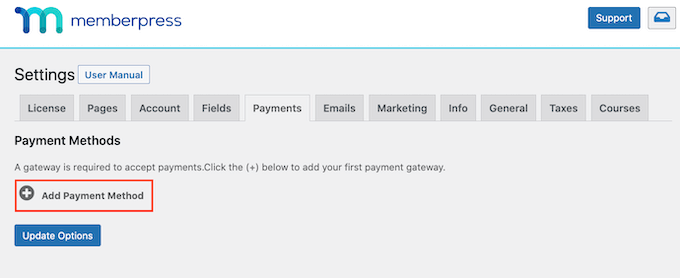
You can now type a name for this payment gateway into the ‘Name’ field.
After that, open the ‘Gateway’ dropdown and choose ‘Stripe (Recommended)’ as your payment gateway.
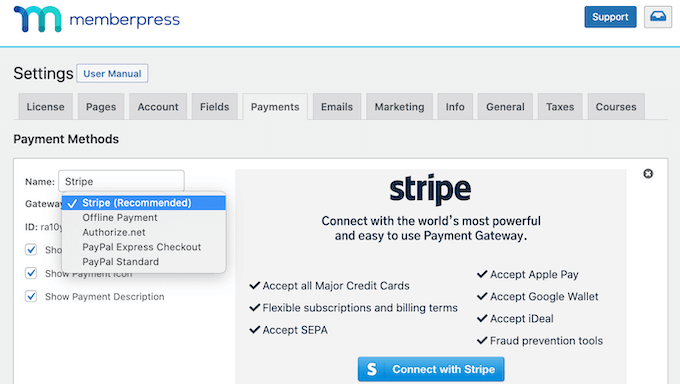
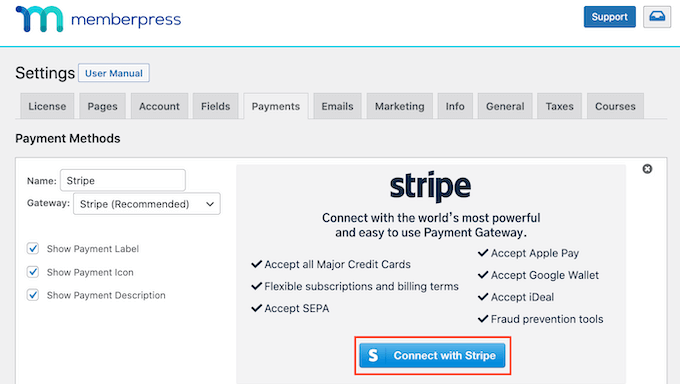
MemberPress will now show some new options that you can use to set up Stripe.
To get started, click on the ‘Connect with Stripe’ button.
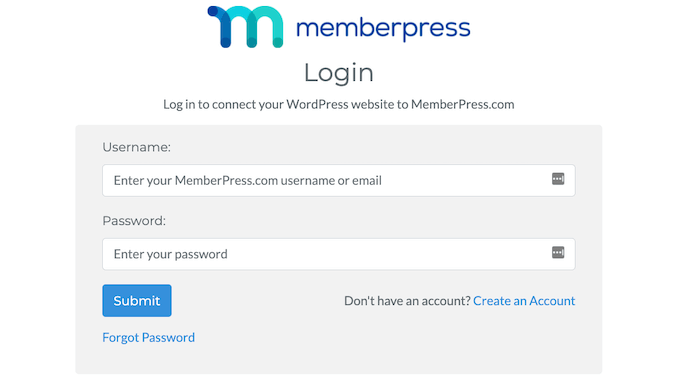
You’ll now be asked to log into your MemberPress account.
After typing your username and password, click on the ‘Submit’ button.
Once you’re logged into your MemberPress account, you’re ready to connect MemberPress to Stripe.
If you don’t already have a Stripe account, don’t worry. MemberPress will walk you through the process of creating an account, step by step.
On the next screen, MemberPress will ask for an email address.
If you already have a Stripe account, then it’s important to type the email address that’s linked to your account.
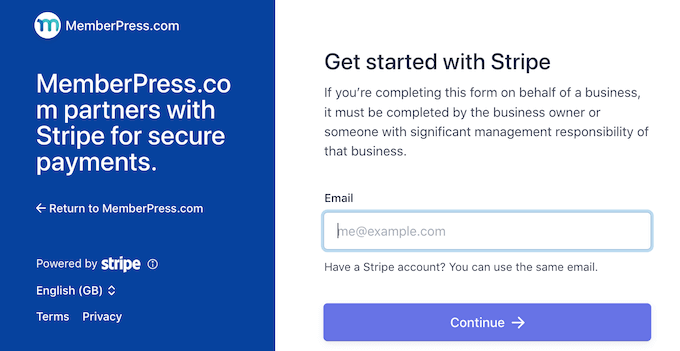
Don’t have a Stripe account? Then you can just type the email address that you want to use for your new Stripe account.
Once you’ve done that, click on the ‘Continue’ button.
MemberPress will now check whether there’s a Stripe account linked to your email address.
If it finds an account, then MemberPress will ask for your Stripe password. You can type this into the ‘Password field’ and then click on ‘Continue.’
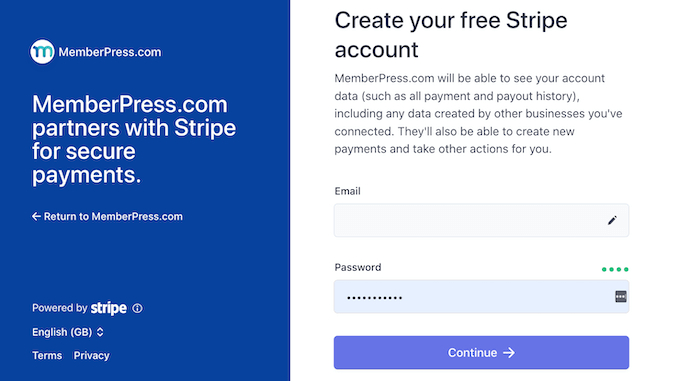
If MemberPress doesn’t find a Stripe account for your email address, then the setup wizard will help you create an account.
After completing the setup wizard, you will be redirected to your WordPress dashboard.
Next, you’ll need to create at least one membership that will collect a recurring payment.
In your WordPress dashboard go to MemberPress » Memberships. You can then click on the Add New button.
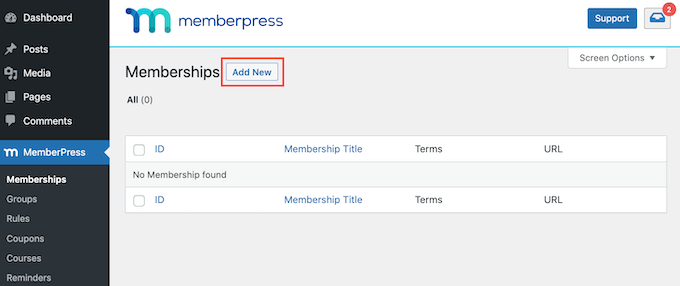
After that you’ll need to type a name for this membership level into the ‘Add title’ field.
This screen also has a text editor where you can add images and text.
All of this content will be displayed on your WordPress website, so this is your chance to promote your membership level. For example, you might want to talk about the exclusive content and features that members will get access to.
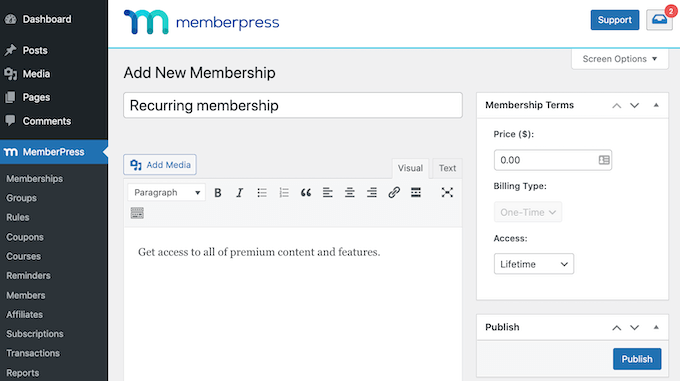
Once you’ve done that, find the ‘Membership Terms’ section towards the right-hand side of the screen.
This is where you’ll enter all the payment details for this recurring membership subscription.
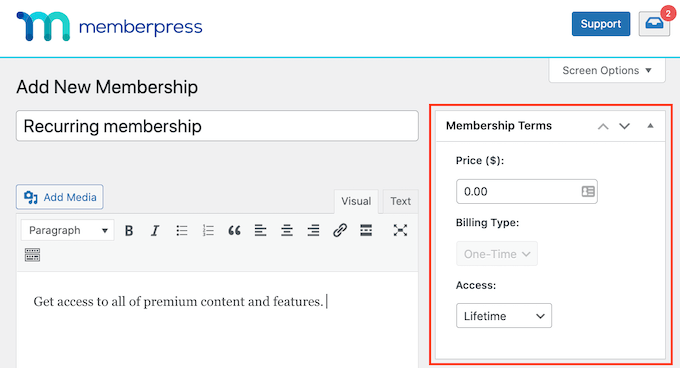
To start, type how much this membership will cost into the ‘Price’ field.
You can then open the ‘Billing Type’ dropdown and choose ‘Recurring.’
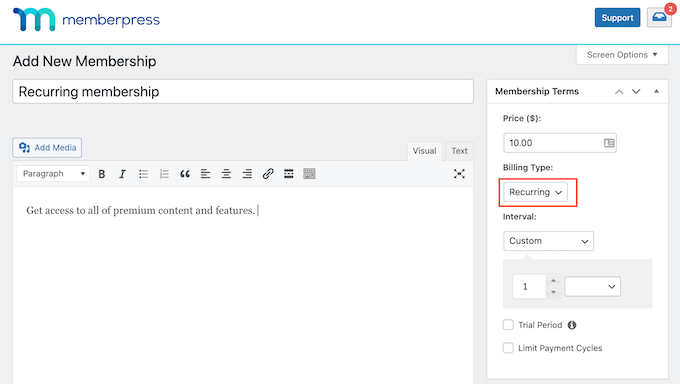
Next you need to set the billing interval for this recurring payment. This is how often your members will be charged.
To see your options, open the ‘Interval’ dropdown. Now simply click to choose an option from this list, such as a monthly or yearly billing interval.
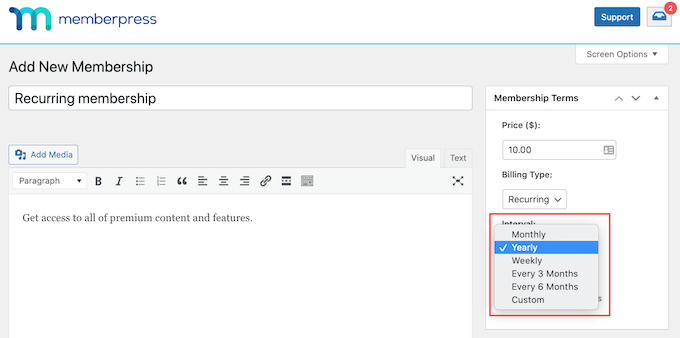
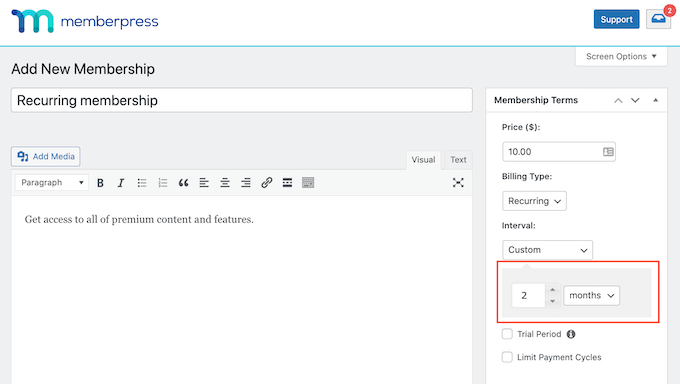
Want to use a different interval? Then simply select ‘Custom’ instead.
WordPress will now add some controls that you can use to create a custom interval.
Many membership websites have a free trial. This gives potential new customers a chance to preview the content and features they will get by buying a membership.
If you decide to offer a free trial, then check the ‘Trial Period’ box.
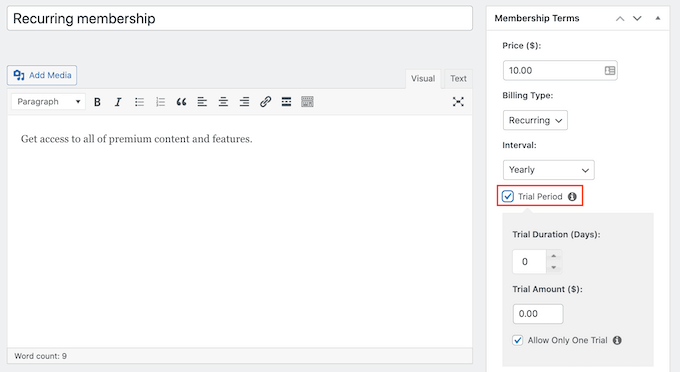
You can now specify how long this trial will last using the ‘Trial Duration (Days)’ settings.
Simply click the arrows to make your free trial longer or shorter.
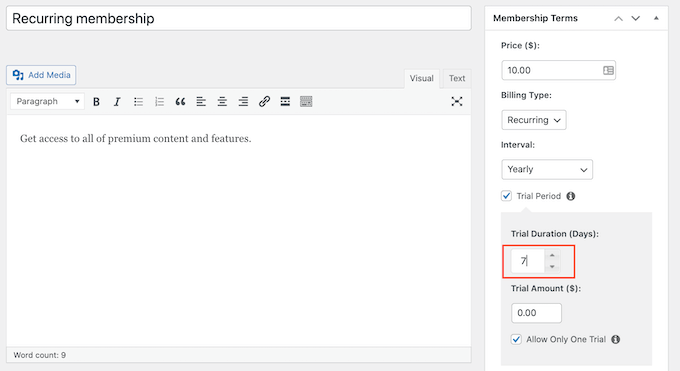
By default MemberPress only offers one free trial to each customer.
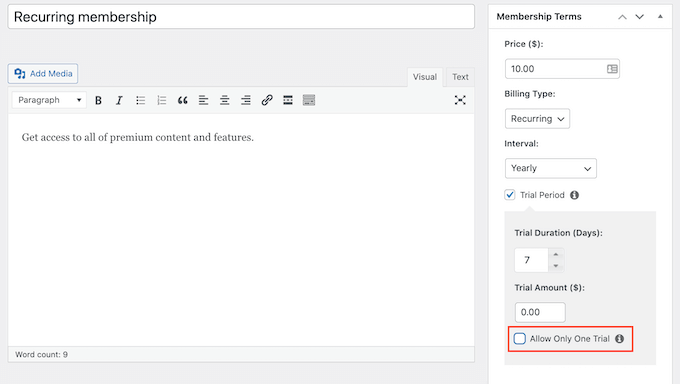
If a member cancels their subscription and then tries to re-subscribe, they won’t get a second free trial.
Another option is to remove this restriction and offer unlimited free trials to every customer. To do this, uncheck the ‘Allow Only One Trial’ box.
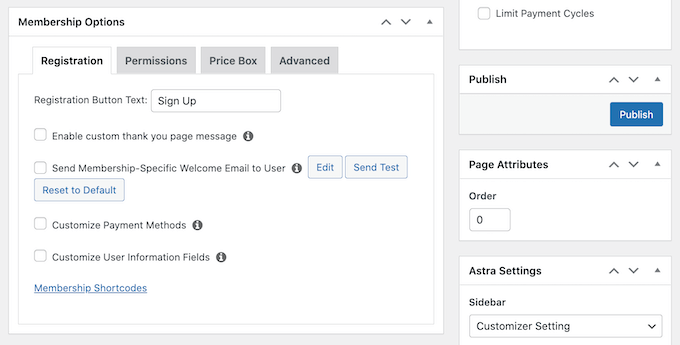
After that, you can scroll down and enter the membership options in the meta box below the post editor.
Here you can change the text that WordPress shows on your membership registration button, and customize the emails that you send to your members.
You’ll want to make sure all the emails sent from your membership website go to the member’s email inbox and not to the spam folder.
The best way to do this is by using an SMTP service provider to improve email deliverability. For more details, see our guide on how to fix WordPress not sending email issue.
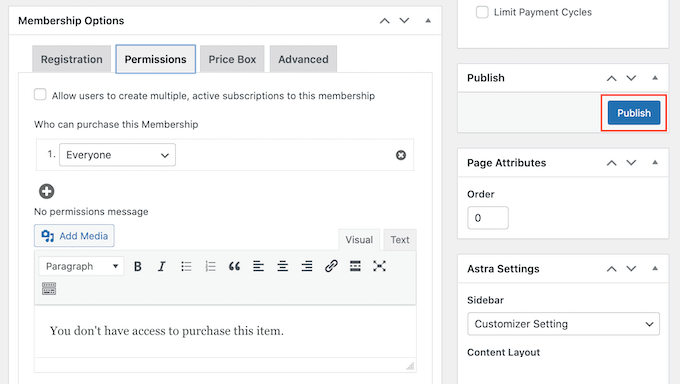
Once you’re happy with how this membership level is set up, you can go ahead and publish your level.
Simply click on the ‘Publish’ button. The people who visit your website can now sign up for a recurring membership.
To see how your new membership registration will look to the people who visit yor website, simply go to MemberPress » Memberships.
On this screen you’ll see the membership level you just created.

You can now hover your mouse over this membership level.
Then, just click on the ‘View’ link.
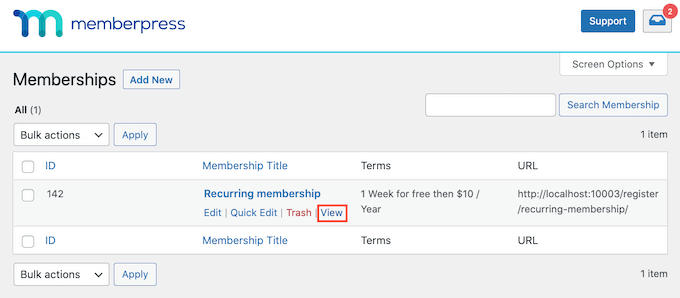
WordPress will now show your membership signup form in a new tab.
Want to offer your visitors a choice of recurring memberships? Simply follow the same process above to create more membership levels.
Once you’ve created a recurring membership, you’ll want to encourage visitors to become members. To get more sign ups you may want to offer perks such as exclusive giveaways and contests, a members-only email newsletter, or extra episodes from your podcast.
Method 3. Accept Recurring Payments Using WP Simple Pay
Another method of accepting recurring payments on your WordPress site is through WP Simple Pay.
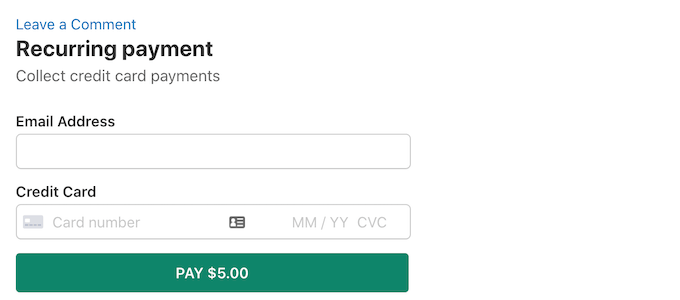
WP Simple Pay is the best WordPress Stripe payments plugin on the market. As you can see in the following image, you can use WP Simple Pay to create a simple recurring payment form. You don’t even need to install an eCommerce or membership plugin.
First, you’ll need to purchase the WP Simple Pay plugin.
After buying this plugin, you’ll get an email containing your license key and a link to download your plugin.
You can now install and activate WP Simple Pay. If you need help, then please see our guide on how to install a WordPress plugin.
Upon activation, the first step is adding your license key.
To get started, head over to WP Simple Pay » Settings. You can now either type or copy/paste your key into the Licence Key field.
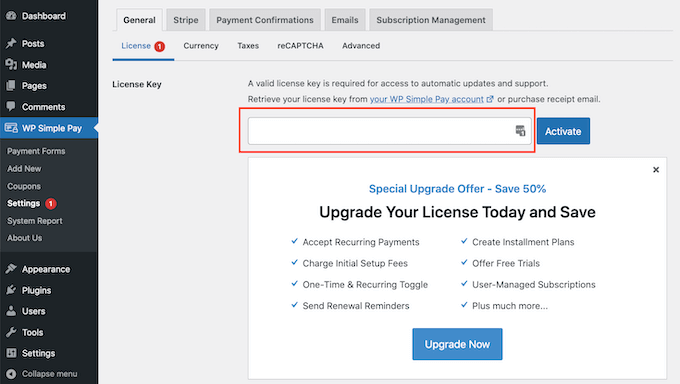
You’ll find this key in your purchase confirmation email.
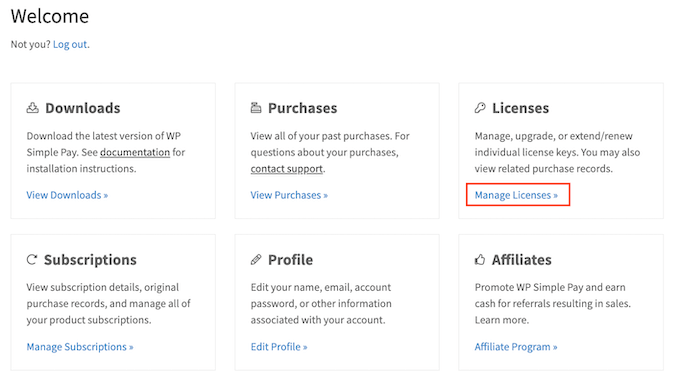
You can also get the license key by logging into your WP Simple Pay account. Once inside your account, click on the Manage Licenses link.
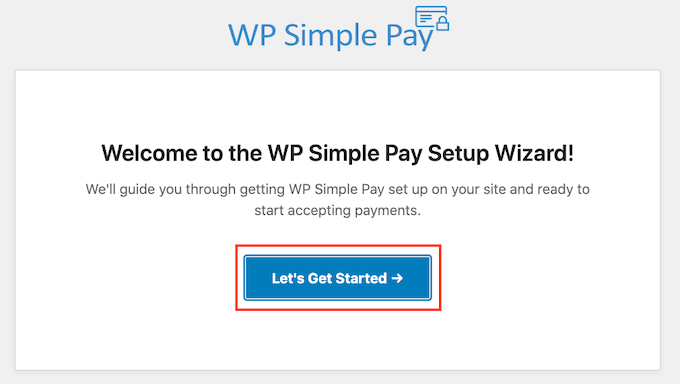
After entering your license key, WP Simple Pay will automatically launch the setup wizard.
Now just click on the ‘Let’s Get Started’ button.
The next step is connecting WP Simple Pay to your Stripe account.
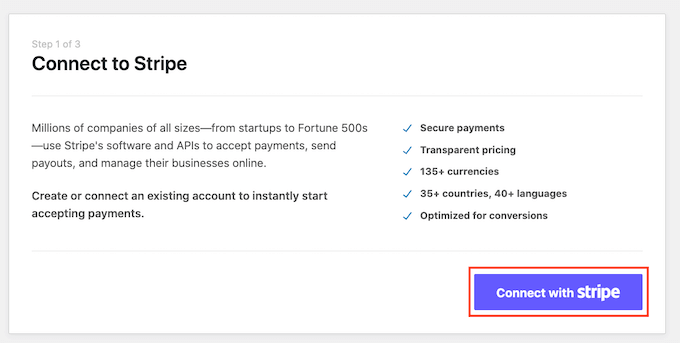
If you don’t already have a Stripe account, then WP Simple Pay will walk you through the process of creating a new account, step by step.
To get started, click on the ‘Connect with Stripe’ button.
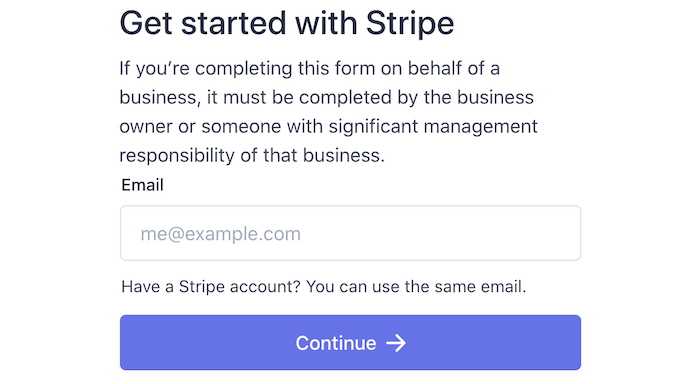
On the next screen, WP Simple Pay will ask for an email address.
If you’re already registered with Stripe, then make sure you type the email address that’s linked to your Stripe account.
You can now follow the onscreen instructions to connect WP Simple Pay to Stripe.
Once you’ve done that, it’s time to create your recurring payment form by going to WP Simple Pay » Add New.
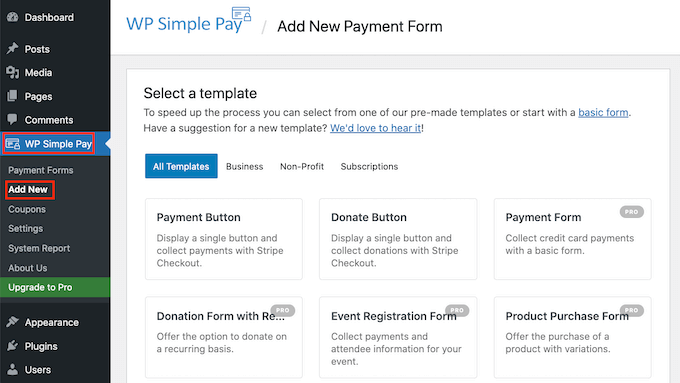
Now hover your mouse over ‘Payment Form.’
After a few moments, you will see a new ‘Use Template’ button. Give this button a click.
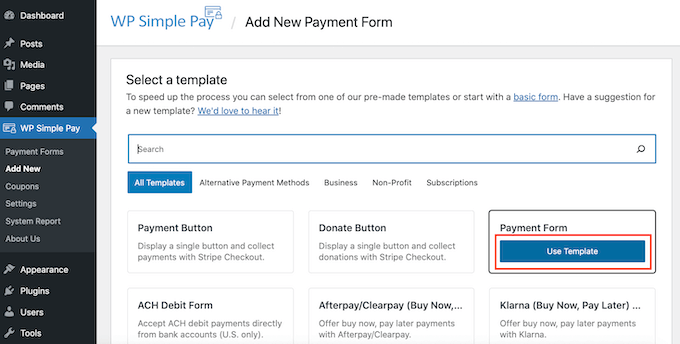
This template will now open in the WP Simple Pay editor, ready for you to customize.
To start, type a name for this payment form into the ‘Title’ field. Your site visitors won’t see this name since it’s for your own reference only.
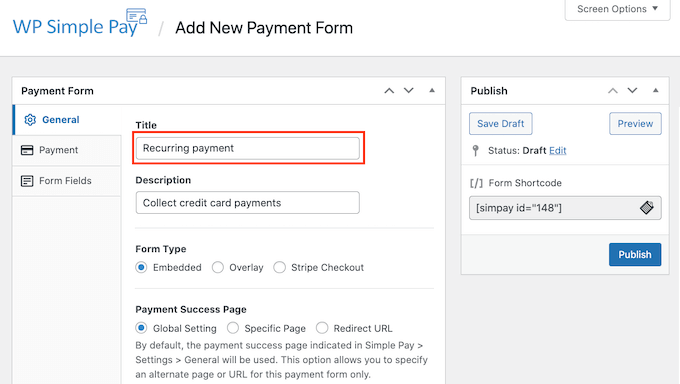
Once you’ve done that, click on the ‘Payment’ tab in the left-hand menu.
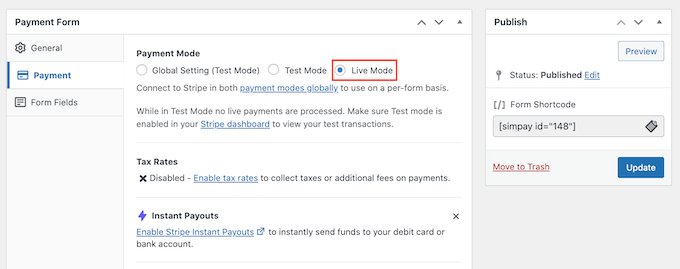
By default WP Simple Pay will create this form in test mode. While it’s in this mode, WP Simple Pay won’t actually process any payments when the form is submitted.
After you’re done testing, to make sure your form can collect and process payments, click on the ‘Live Mode’ button.
After that, scroll to the Price Options section.
Here, you just need to click on the Add Price button.
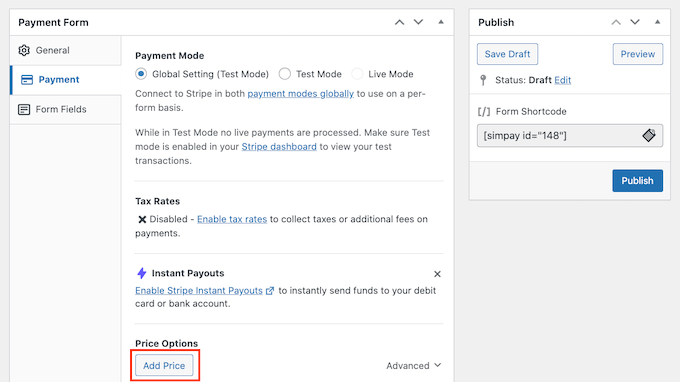
This adds a new ‘Amount’ section.
The default setting is ‘USD ($) 1.00,’ which is a one-time payment. Since we’re creating a recurring payment form, click on the ‘Subscription’ button.
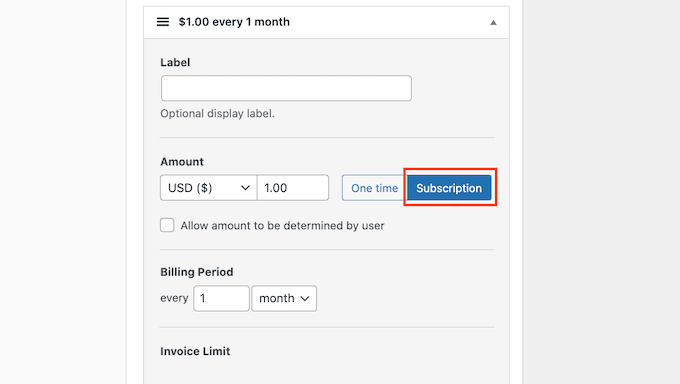
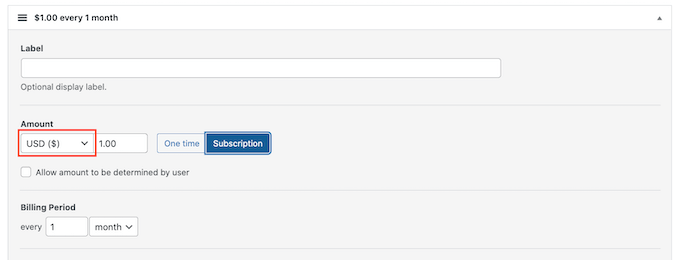
WP Simple Pay collects its payments in US dollars by default.
If you want to get your payments in a different currency, just click on the ‘USD ($)’ field. You can now choose a new currency from the dropdown menu.
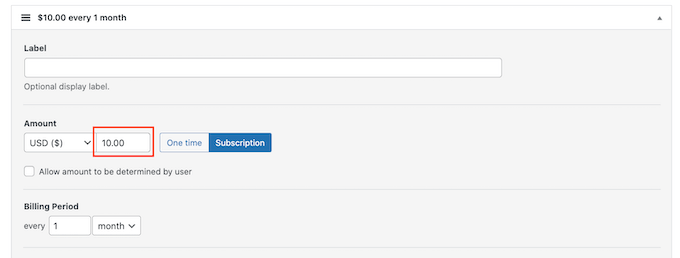
In the ‘Amount’ field type how much this recurring product or service will cost.
This is the amount your customers will be charged during each billing period.
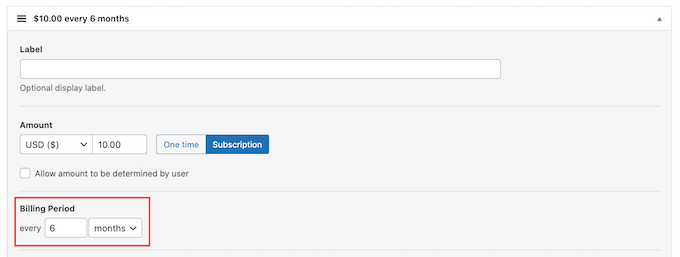
Next, move to the ‘Billing Period’ section. Here you can specify how often WP Simple Pay will collect this amount from your customers.
For example, you might charge your customers $10 per month or $100 once a year.
Free trials can be a smart offer to encourage visitors to give your products or services a chance. If you want to offer a free trial, then scroll to the ‘Free trial’ section.
You can now type how many days your free trial will last.
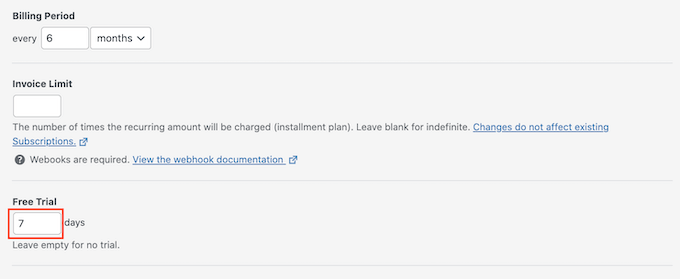
If you don’t want to offer a free trial, just leave this field blank.
Sometimes you may want to charge new subscribers a one-time setup fee. If this is the case, you can type this charge into the ‘Setup Fee’ box.

Once you’re happy with your settings, it’s time to build your recurring payment form.
Simply click on the ‘Form Fields’ tab to launch WP Simple Pay’s form builder.
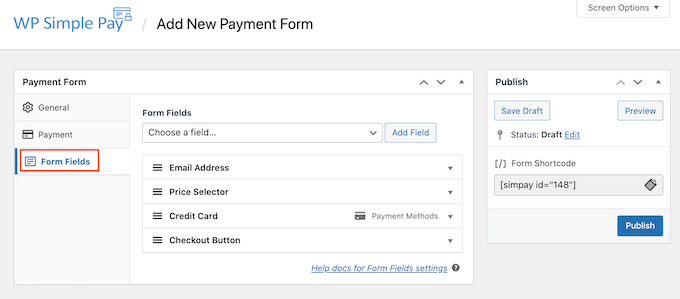
You can now customize any of the form’s default fields.
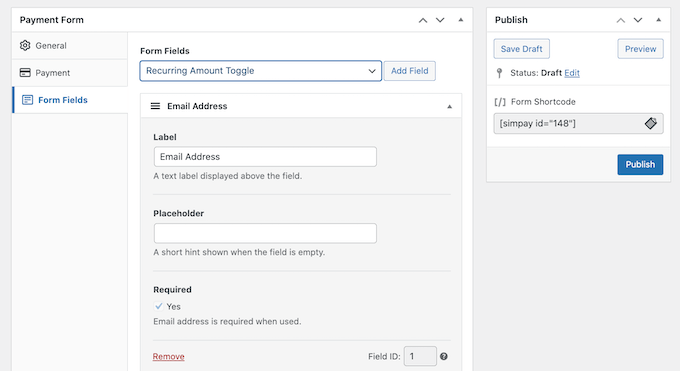
To edit a field, simply give it a click. This section will now expand to show all the settings that you can customize, such as changing the field’s label or adding some placeholder text.
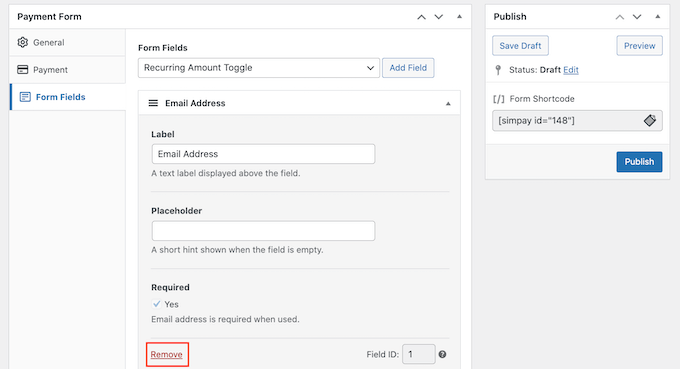
You can also remove fields from your recurring payment form.
To delete a field, simply click on its ‘Remove’ link.
You can also add more fields to your recurring payment form by clicking on the ‘Form Fields’ dropdown menu. For example, you could ask for your customers’ shipping address or phone number.
Then, simply choose a field from the dropdown menu.
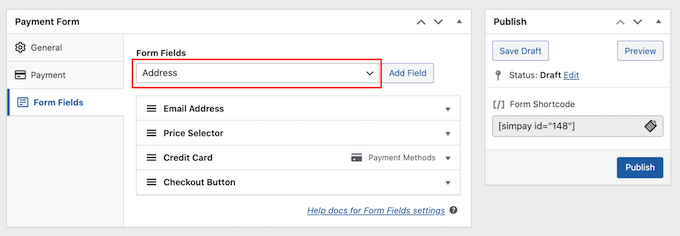
After selecting a field, go ahead and click on the ‘Add Field’ button. WordPress will now add this field to your recurring payment form.
Finally, you can change the order fields appear in your form using drag and drop.
As you’re customizing your form, you may want to check how it will look to your visitors. To do this, click on the ‘Preview’ button in the upper-right corner.
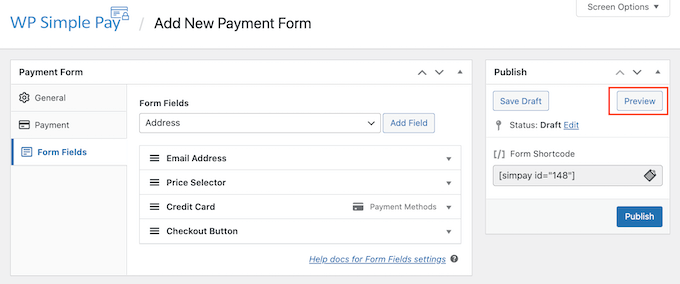
When you’re happy with how your form looks, click on ‘Publish.’
You can now add this form to your website by copying the ‘Form Shortcode’.
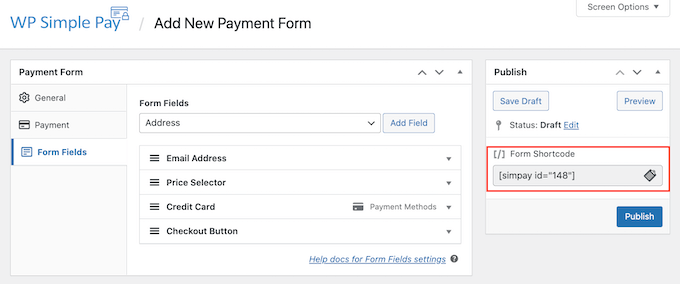
Now you just need to paste this shortcode into any page, post, or widget where you want to show the recurring payment form.
For more details on how to place the shortcode, you can see our guide on how to add a shortcode in WordPress.
Method 4. Accept Recurring Payments Using WooCommerce
WooCommerce is the world’s largest eCommerce platform. It is one of the best eCommerce plugins for WordPress because it’s cost-effective, easy to manage, and you can use it to sell physical goods, services, and subscriptions.
If you already have a WordPress website, then you can simply install and activate the WooCommerce plugin.
If you don’t have a website, then you’ll need to buy a domain name, SSL certificate, and a WooCommerce hosting account.
When it comes to WooCommerce hosting, we recommend using Bluehost.
Bluehost is an official WordPress recommended hosting provider, and they are offering WPExperiencecoder users a free domain name, a free SSL certificate, and a generous discount on WooCommerce hosting.
To sign up, go to the Bluehost website and then click on the ‘Start Your Store’ button.

Next, select a plan of your choice. If you are just starting out, then we recommend opting for the Starter plan.
After that, you can enter a domain name for your WooCommerce store.
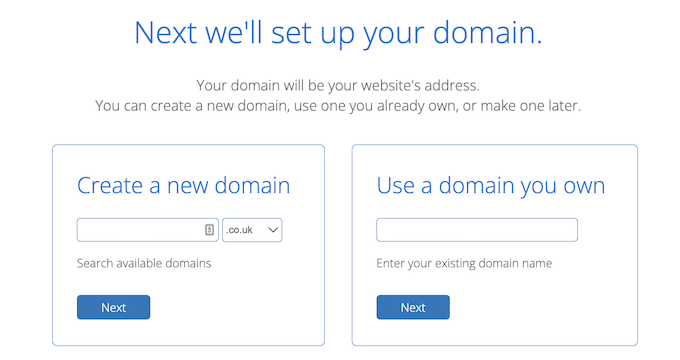
Bluehost will then ask for your account and package information. It will also suggest some optional package extras that you can add to your order.
If you’re unsure whether you need these extras, then just leave them for now. You can always add them to your hosting account in the future.
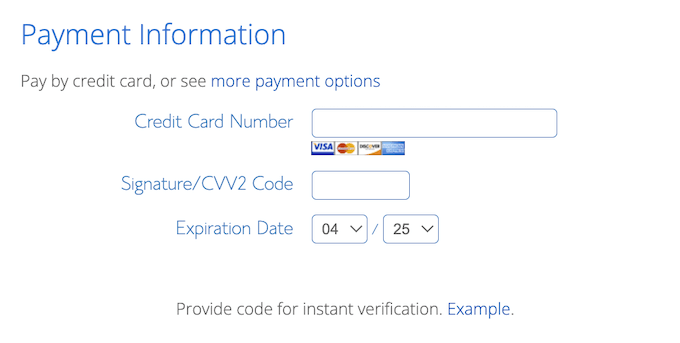
Lastly, enter your payment information, agree to the terms of service, and click the ‘Submit’ button at the bottom of the page.
Once you’ve signed up for Bluehost, you’ll get an email with details about how you can log into cPanel, which is Bluehost’s web hosting control panel.
The best part about using Bluehost is that WordPress comes pre-installed.
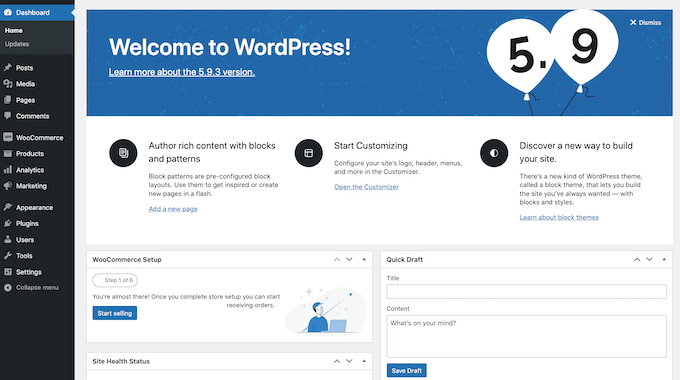
When you first log in to your cPanel account, you’ll get a popup message. Just click on the ‘log in to your site’ button and cPanel will take you to the WordPress admin area.
You’re now ready to set up your WooCommerce store.
Setting up Recurring Payments in WooCommerce
Before you can set up recurring payments in WooCommerce, you’ll need to add at least one payment gateway.
There are many WooCommerce payment gateways that you can use, but Stripe is the best payment solution.
By default, WooCommerce doesn’t offer Stripe as a payment option. However, you can accept recurring payments using Stripe by installing the WooCommerce Stripe Payment Gateway.
First, you’ll need to download, install and activate the WooCommerce Stripe Payment Gateway. If you need help, then please see our guide on how to install a WordPress plugin.
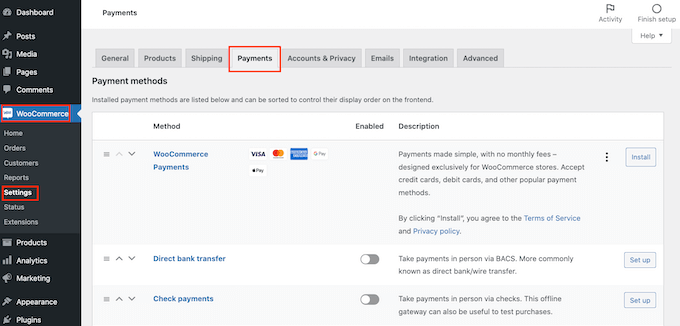
After activating this plugin, go to WooCommerce » Settings. Then click to select the ‘Payments’ tab.
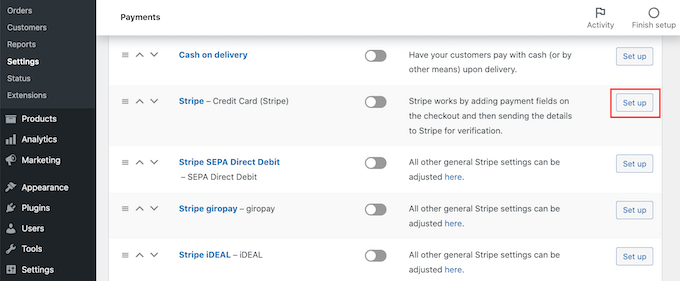
Now scroll to the ‘Stripe – Credit Card’ option.
Here, click on the ‘Set up’ button.
This launches a set up wizard that will show you how to connect WooCommerce to Stripe.
On the next screen, click on the ‘Enter account keys’ button.
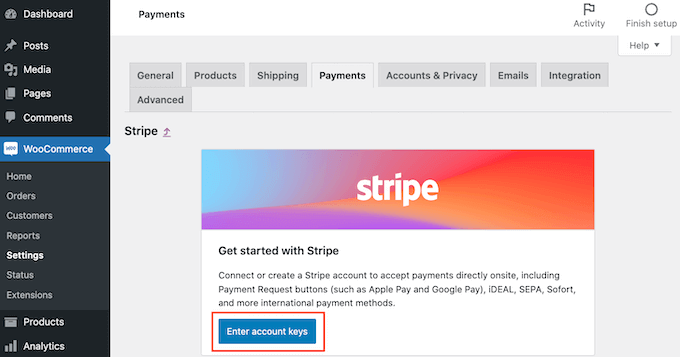
WooCommerce will now ask for your Stripe account keys. To get this information, log into your Stripe dashboard in a new tab.
Inside the Stripe dashboard, select ‘API keys’ from the left-hand menu.
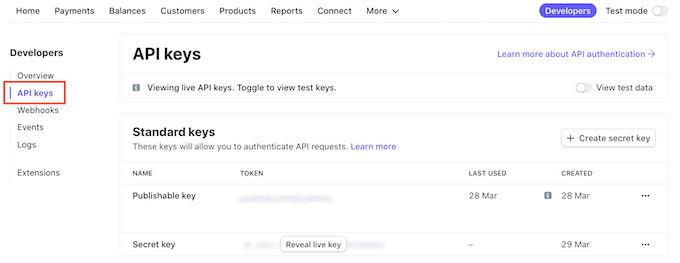
You can now copy the ‘Publishable key.’
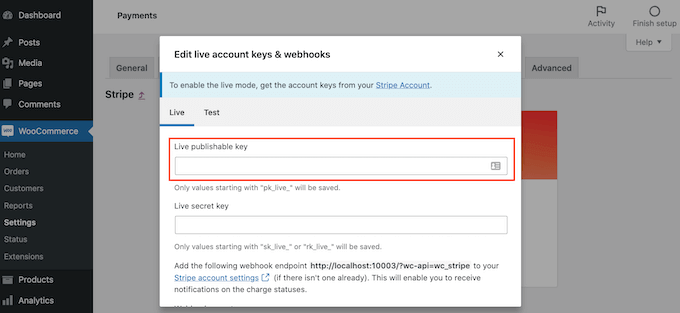
Then, switch back to your WordPress dashboard and paste this key into the ‘Live publishable key’ field.
Once you’re done with that, switch back to your Stripe dashboard and click on the ‘Reveal live key’ button.
This will show your secret key.
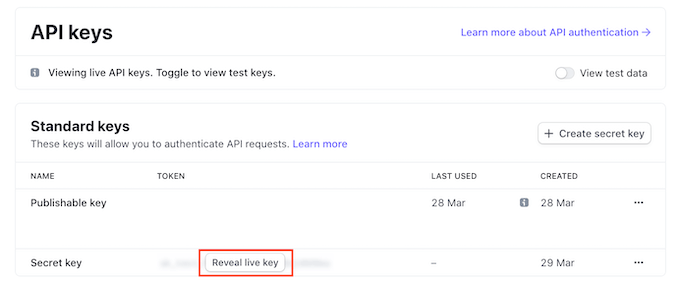
You can now head back to your WordPress dashboard and paste this key into the ‘Live secret key’ field.
After that, just click on a the ‘Test connection’ link.
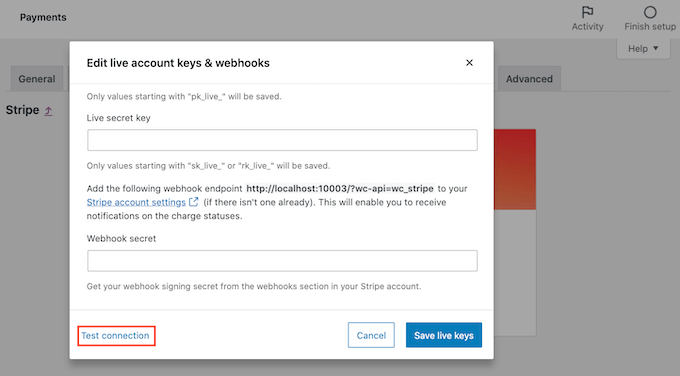
After a few moments, you will see a ‘Connection successful’ message. This means that WooCommerce is now connected to your Stripe account.
You can now go ahead and click on the ‘Save live keys’ button.
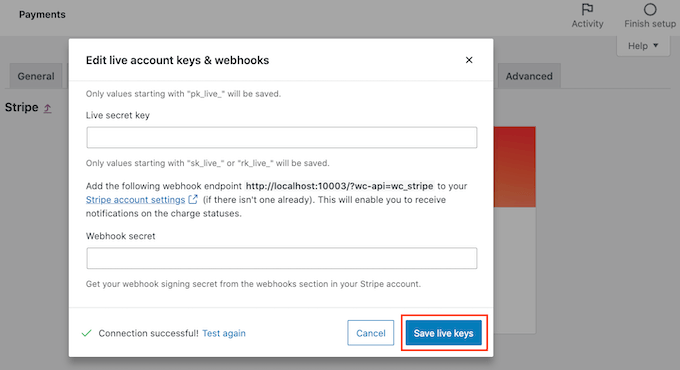
This will take you to the Stripe ‘Settings’ screen.
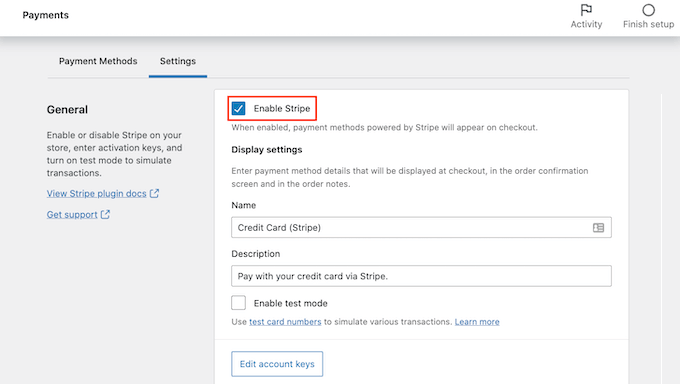
On this screen, check the ‘Enable Stripe’ box.
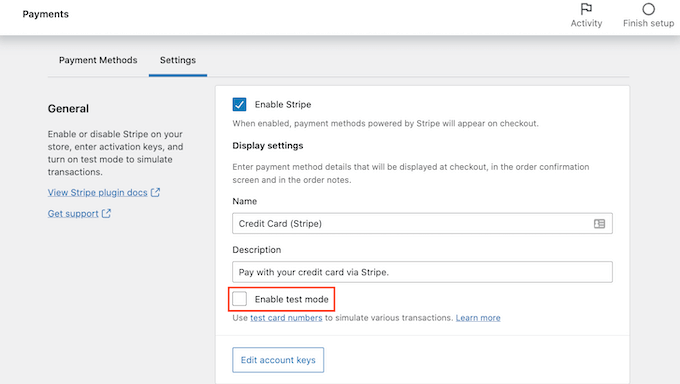
You’ll also want to uncheck the ‘Enable test code’ box.
This takes your Stripe connection out of test mode, so you can start accepting payments from your customers straight away.
Next, scroll to the very bottom of the screen and click on the ‘Save changes’ button.
After that, you’ll need to install and activate the WooCommerce Subscriptions extension. You can install this extension just like any other WordPress plugin. For details, see our step by step guide on how to install a WordPress plugin.
WooCommerce Subscriptions is a paid extension, and will cost you $199 per year.
Once you have downloaded and activated the extension, you can add recurring payments to any WooCommerce product.
Let’s see how you can create a new product with a recurring payment. In your WordPress dashboard go to Products » Add New.
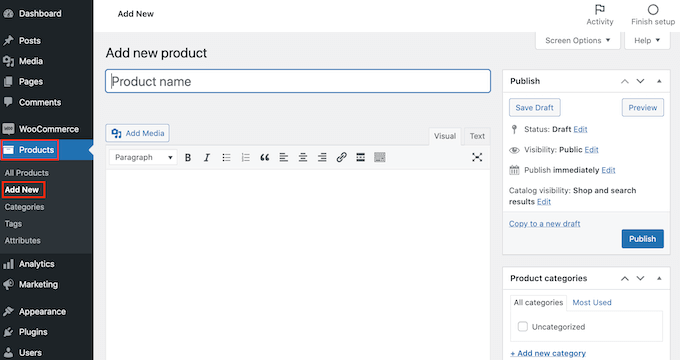
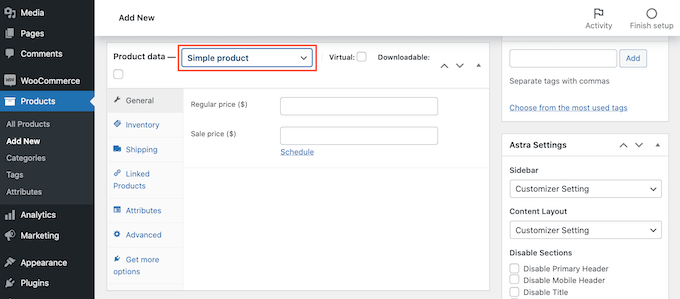
Then scroll to the ‘Product Data’ box.
You can now click to open the ‘Product Data’ dropdown. In this dropdown menu you’ll see two new options: ‘Simple subscription’ and ‘Variable subscription.’
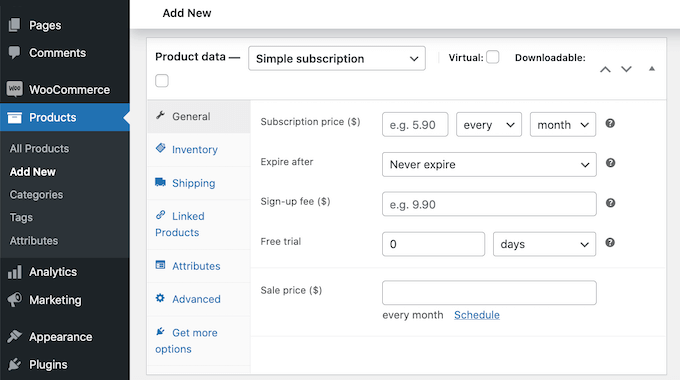
If you select ‘Simple subscription’ then WordPress will show fields where you can set your subscription price and billing interval.
You can also choose the expiration period, and add an optional sign up fee.
To encourage people to buy a subscription you may also want to offer a free trial.
Another option is to choose ‘Variable subscription’ from the dropdown menu. These variable subscriptions are similar to WooCommerce’s variable products.
If you select ‘Variable subscription’ then you’ll need to create product variations. To do this, click on the ‘Attributes’ tab.
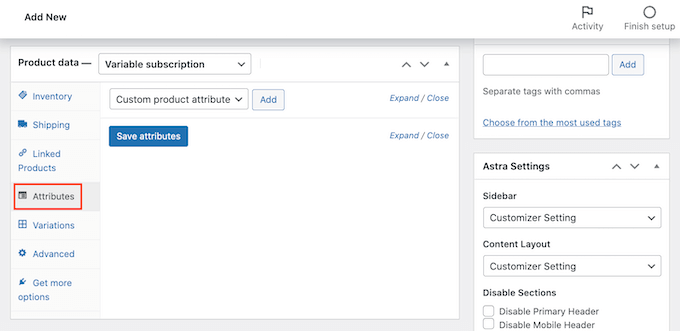
If you’ve already created some product attributes, then you can click on the ‘Custom product attribute’ dropdown.
You can then choose any attribute from the dropdown menu.
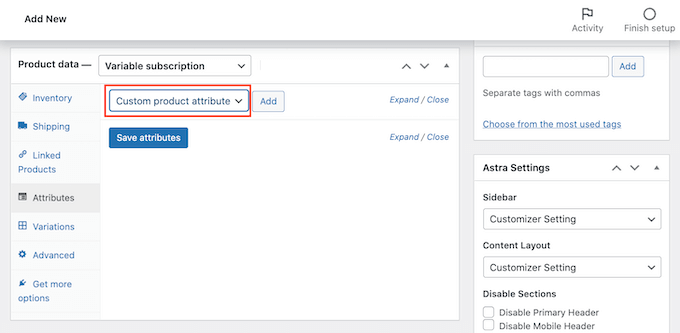
Another option is to create a new attribute and add it to your variable subscription.
To create an attribute, click on the ‘Add’ button.
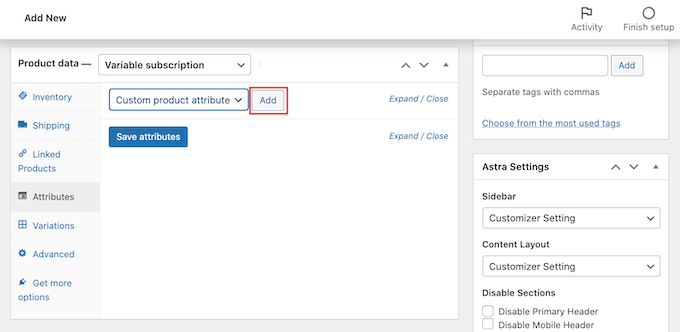
You will now see a new section where you can create your product attributes.
You’ll want to add these attributes to your product variations. With that in mind, make sure you check the ‘Used for variations’ box.
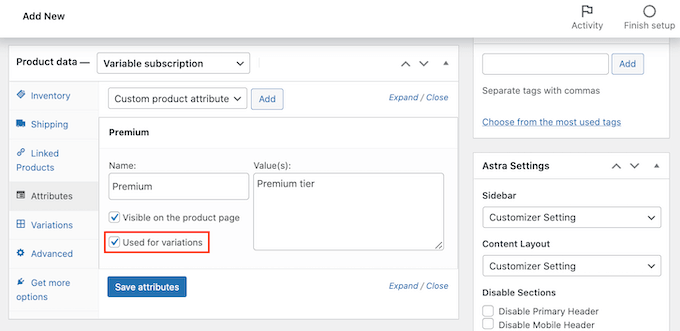
Once you’ve entered all the information for this attribute, click on ‘Add.’
To create more attributes, simply follow the same process described above.
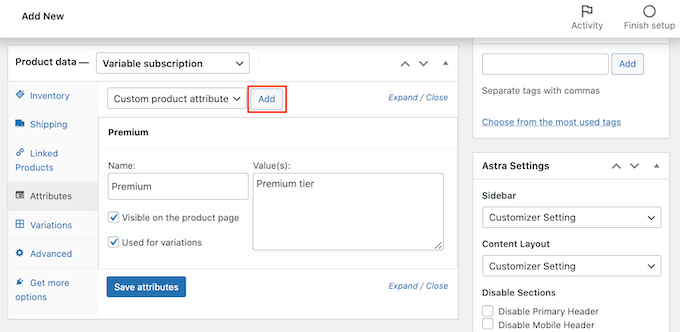
When you’re happy with your new attributes, click on ‘Save attributes.’
Next click on the ‘Variations’ tab followed by the ‘Go’ button.
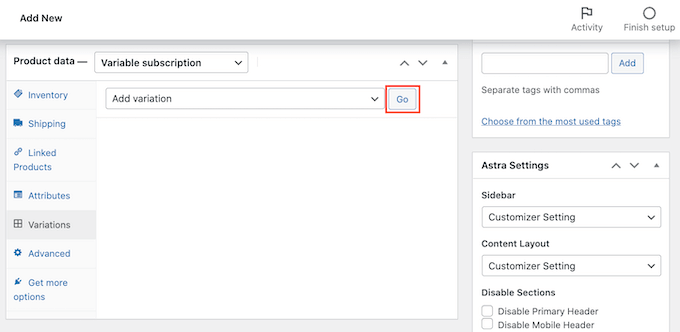
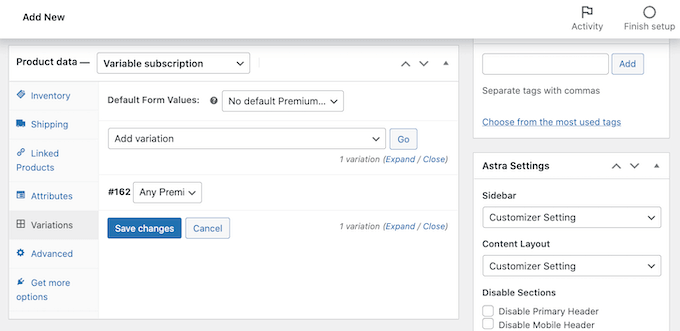
WooCommerce will now add a new section.
You can use these new settings to create subscription variations using the attributes you added in the previous step.
Once you are happy with the product’s settings, click on the ‘Publish’ button.
Now, you can visit your website to see this new WooCommerce product live.
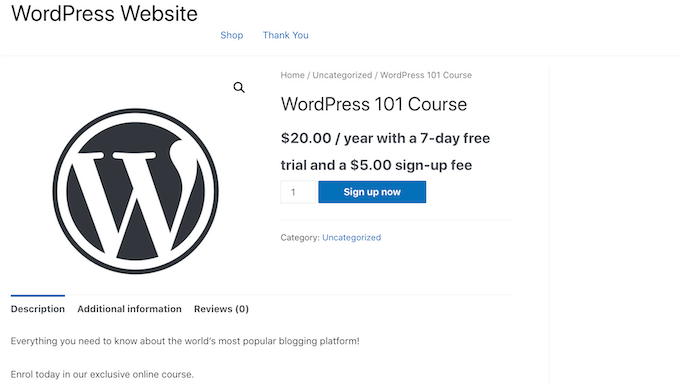
Once you’ve successfully added recurring payments to your WooCommerce site, you’ll want to drive people to your product pages.
You can learn how to do that in our step by step guide on how to create a WooCommerce popup to increase sales, or see our pick of the best WooCommerce plugins for your store.
Which is the Best WordPress Recurring Payment Plugin?
The best WordPress recurring payment plugin depends on your business goals and needs. If you just want to accept recurring payments without the hassle of a full shopping cart plugin, then both WPForms and WP Simple Pay are good choices.
On the other hand, if you want to selling subscription-based memberships, then MemberPress is the best solution. This plugin lets you accept recurring payments, and even comes with a built-in online course builder that you can use to create and sell digital courses.
We hope this article helped you learn how to accept recurring payments in WordPress. You may also want to see our guide on how to get a free SSL certificate for your website, or our expert comparison of the best live chat software for small businesses.
If you liked this article, then please subscribe to our YouTube Channel for WordPress video tutorials. You can also find us on Facebook and Facebook.
The post How to Accept Recurring Payments in WordPress (4 Methods) first appeared on WPExperiencecoder.